![How to Balance a 20lb Shoulder Rig Without Back Pain [2026]](https://rigs.creatorrigreviews.com/wp-content/uploads/2026/03/How-to-Balance-a-20lb-Shoulder-Rig-Without-Back-Pain-2026.jpeg)
How to Balance a 20lb Shoulder Rig Without Back Pain [2026]
Ever been in the middle of a shoot, feeling that all-too-familiar ache creeping into your back after just a few hours? I remember that lightbulb moment during a long day of filming, when I realized the weight of my 20lb shoulder rig was taking a serious toll on me. My back was sore, my posture was suffering, and I was questioning whether all this effort was worth it. Sound familiar? If you’re like me, you’ve probably invested in top-notch camera gear, yet still struggle with the discomfort and instability that comes with balancing a heavy rig for extended periods.
Why Balancing Your Camera Rig Properly Matters More Than You Think
Properly balancing a shoulder rig isn’t just about making your footage look smooth; it directly impacts your health. A poorly balanced rig can lead to back pain, fatigue, and even long-term injuries. I learned this the hard way early in my career, making the mistake of ignoring rig balance and thinking that strength alone could compensate. As a result, I ended up with sore shoulders and a sore back, feeling physically drained and mentally frustrated. That experience pushed me to dive deeper into rig ergonomics and discover practical ways to distribute weight evenly. According to a study published in the Journal of Orthopaedic & Sports Physical Therapy, improper rig setup can cause musculoskeletal issues that persist long after a shoot ends.
If you’ve faced similar struggles, you’re not alone. The good news is that with some simple adjustments and a little know-how, you can achieve a stable, comfortable setup that lets you focus on capturing the perfect shot without sacrificing your back. That’s exactly what I want to share today: how to balance your 20lb shoulder rig effectively, so it feels like an extension of your body—not a burdensome load dragging you down.
Is Overloading Your Gear Really Worth the Risk?
Honestly, I used to think that more gear meant better shots, but I learned the hard way that extra weight and poor balance just increase fatigue and the risk of injury. Early on, I made the mistake of stacking accessories without considering their impact on weight distribution, which only made my setup unwieldy. I wish I had known better at the time—it’s one of the most common pitfalls I see fellow filmmakers make. Learning how to fine-tune the balance of your rig can save your back and extend your filming stamina significantly. Curious about how to do it right? Keep reading, because next, we’ll dive into the practical steps that will transform your rig and your shooting experience.
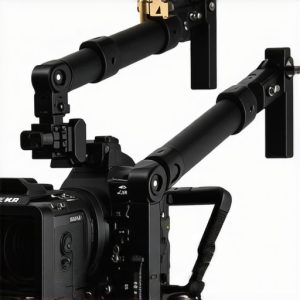
Start with a Proper Top Handle Setup
Think of your top handle as the steering wheel of your rig; it should guide your entire setup. Attach your top handle using sturdy NATO rails or bolt-on brackets to prevent wobble. When I first added a quick-release NATO top handle, I found it was slipping during vertical shots, causing instability. Fix this by tightening all screws and adding anti-slip pads under the handle for a firm grip. Check if the handle stays secure when you shake it gently. Visit this guide for detailed tips on securing your top handle properly.
Balance the Camera and Accessories
Imagine your rig as a teeter-totter; if one side is heavier, it tips and causes fatigue. Place your heavier accessories like monitors or wireless transmitters closer to the center to minimize lever arm effects. I once overloaded my cage with a massive matte box and extended baseplate, which made balancing impossible. To fix this, I moved the matte box forward, swapped to a lightweight cage, and adjusted the weight distribution using counterweights. Using counterweights helped me achieve a neutral balance, reducing strain on my back.
Adjust Rig Components for Ergonomics
Fine-tuning your rig’s components can drastically improve comfort. Slide the shoulder pad forward or backward to find the sweet spot where weight sits evenly on your shoulder. Experiment with the position of your side handles; placing them at different angles can alleviate wrist and shoulder strain. I once rotated my side handles inward, which minimized wrist torque during handheld shots. Check out this article to learn optimal handle placements for prolonged shooting sessions.
Secure All Connections and Accessories
Loose screws or missing pins turn your rig into a jiggly mess. Regularly tighten all bolts, especially around the top handle, cage, and cold shoe mounts. For instance, I overlooked a loose cold shoe screw, causing my monitor to bounce and distract me during a shoot. After tightening and adding locking adapters, the stability improved immensely. Remember, a tight rig helps maintain balance and reduces fatigue.
Test and Fine-Tune on Set
Don’t assume your setup is perfect off-camera. Always test by simulating your shooting conditions—walk, run, and move your camera as you would during actual filming. Adjust counterweights, handle positions, and accessories as needed. I once spent 10 minutes rebalancing after realizing my rig was shifting during a dynamic scene. Small tweaks, such as shifting a counterweight or tightening a screw, paid off by keeping me stable without exerting extra effort. Use this iterative process to refine your balance, ensuring comfort and steady footage throughout your shoot.
Many filmmakers believe that investing in high-end top handles, shoulder rigs, or carrying countless rig accessories automatically guarantees professional results. But in my experience, this mindset often leads to overlooked nuances that can sabotage your setup. Let’s dig deeper into one common misconception: that more equipment equals better stabilization and comfort. In reality, overloading and improper configurations can be counterproductive, causing fatigue, jitter, and even long-term injuries. Many assume that securing multiple accessories tightly is enough, but the real secret lies in understanding how these components interact and how subtle adjustments can dramatically enhance your shooting experience. Don’t fall into the trap of thinking that the more gadgets you attach, the better your footage; instead, focus on optimizing each connection for maximum stability.
One of the most insidious pitfalls is assuming that rig components are universally compatible. For example, classic cold shoe mounts or standard 1/4-inch threads may seem sufficient, but they often lack the anti-twist features necessary for dynamic shoots. This oversight can cause your mounted monitors or microphones to wobble, introducing unwanted jitter that ruins a shot. I learned this the hard way when my monitor kept drifting despite being securely mounted. The solution? Upgrading to anti-rotation plates and using locking cold shoe adapters that prevent rotation during vigorous movement. It’s this attention to the hidden details that distinguishes a good shoot from a great one.
Why do so many seasoned shooters still struggle with rig stability?
This is where the advanced nuances come into play. Even seasoned filmmakers often overlook rig balancing and weight distribution at the micro-level. For instance, merely placing heavier accessories near the center of the rig isn’t enough; subtle shifts—like adjusting end-cap weights—can mean the difference between a fatigue-free day and a grueling marathon. Studies in ergonomics reveal that small weight shifts can reduce muscular strain significantly, allowing for longer shoots and sharper footage. The key is to test your setup meticulously—walk, run, and simulate moves like camera operators in the field—and iteratively fine-tune each component. Remember, the goal isn’t just technical perfection but also maintaining comfort over extended periods.
Finally, avoid the trap of complacency. As you upgrade your rig, revisit optimization tips regularly. A rigid camera cage with proper anti-vibration mounts and well-placed accessories can elevate your work from amateur to professional level. When I shifted my focus from simply stacking gear to meticulous fine-tuning, my footage improved noticeably. The same applies to your setup—don’t settle for default configurations; master the art of nuanced adjustments.
Have you ever fallen into this trap? Let me know in the comments. For comprehensive guidance on refining your rig, check out mastering camera rigs in 2025.
Maintaining your camera rig, especially when you’re relying on high-quality equipment like top handles, shoulder rigs, and various rig accessories, is essential for consistent performance and durability. Invest in high-quality tools like the locking cold shoe adapters and anti-rotation pins to prevent unwanted movement and wear over time. Regularly inspecting and tightening all connections ensures that components remain secure, reducing the risk of damage during shoots. Using a dedicated HDMI port protector and cable management tools minimizes wear on vital ports, extending the lifespan of your cables and ports. Moreover, applying a light coating of silicone lubricant on moving parts, such as rosettes and quick-release mechanisms, can keep mechanisms smooth and responsive, preventing rust and corrosion.
Based on the technical documentation from Kino Flo’s specs on durability, routine maintenance of your rig components can greatly reduce long-term wear, ensuring your setup remains reliable through intense filming schedules. Incorporate scheduled checks into your workflow—especially after travels or heavy usage—and address any signs of fatigue or looseness immediately. This proactive approach helps avoid costly repairs or replacements down the line.
As for tools, I highly recommend carrying a compact multi-tool specifically designed for camera gear. It allows you to tighten or adjust small screws and bolts quickly on set, saving you time and preventing downtime. Additionally, a set of anti-slip pads are invaluable for ensuring stability of accessories that might loosen over repeated use.
Looking ahead, future trends suggest smart, sensor-integrated rig components that can alert you when maintenance is needed in real-time, much like automotive diagnostics. Until such innovations become mainstream, diligent manual checks remain your best defense against unexpected failures.
**How do I maintain my camera rig over time?** The key is establishing a routine—schedule weekly inspections of all connection points, keep your tools handy for quick adjustments, and replace worn parts before they fail. Remember, your rig is an investment; protecting it pays off with longer lifespan and better performance.
Finally, take advantage of advanced tips like applying silicone lubricant to your rosettes or using cable clamps from professional cable management techniques. Try incorporating one of these into your maintenance routine today and notice how your rig’s responsiveness and longevity improve over time.
What No One Tells You About Rig Comfort
Early in my filmmaking journey, I believed that investing in premium gear was enough—until I faced persistent back pain and shaky footage. The breakthrough came when I realized that rig ergonomics and micro-adjustments made a world of difference. That hard-earned lesson taught me that precision in setup isn’t just about stability; it’s about safeguarding your health and longevity as a creator.
My Go-To Tools for Creating Stable, Ergonomic Rigs
Over the years, I’ve come to rely on a curated toolkit: trustworthy locking cold shoe adapters ensure your monitors stay put during intense moves, while anti-rotation pins prevent frustrating twists. Don’t forget a quality high-grip screw set—they’re lifesavers for quick fixes on set. These tools have saved me time and prevented costly mishaps, and I recommend keeping them close for every shoot.
Embracing Fine-Tuning for Long-Lasting Shoots
Consistency comes from continuous micromeasurements and small adjustments. I learned this by spending extra minutes testing different handle angles, counterweight placements, and pad positions before each shoot. The payoff? Less fatigue, sharper footage, and a more confident shoot. Remember, anything worth doing is worth fine-tuning—your rig’s comfort and your footage’s quality depend on it.
How Mastering Rig Balance Changed My Perspective
Initially, I thought a heavy rig with lots of accessories signified professionalism. But I now see that simplicity and precise balance foster better results and happier bodies. Overloading might seem impressive, but unbalanced setups cause fatigue and unstable shots. My advice? Prioritize ergonomic essentials over bulk. This shift in mindset has transformed my shooting efficiency, and it can do the same for you.
Are You Ready to Take Your Rig Game to the Next Level?
Focusing on meticulous balance isn’t just for pros—it’s a game-changer for anyone serious about filmmaking. Explore the resources I trust, like comprehensive guides on perfecting your filming setup, and get experimental with your rig adjustments. Remember, small improvements today lead to long-term success.
What’s the biggest challenge you face when balancing your camera rig? Share your experiences below—I’d love to help refine your setup!
,