Stop Snapping Cables: 3 Toughest 2026 Camera Cages for Pro Work
I’ll never forget the frantic scramble on set, cables snapping, footage slipping away, and my frustration boiling over. It was a stark realization—my gear was not just a tool but a potential weakness in the chain. That day, I discovered something crucial: choosing the right camera cage can make or break your shoot, especially when you’re pushing your limits in 2026’s demanding environments. If you’ve ever wrestled with unstable rigs or busted cables mid-shoot, you know exactly what I mean.
Why Reliability Matters More Than Ever in 2026
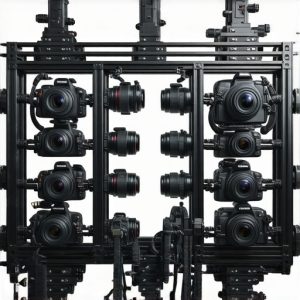
In today’s fast-paced film world, every second counts. Equipment failures not only slow down production but can also cost hundreds, if not thousands, of dollars. As camera technology advances, so do the demands from rigs—more accessories, heavier loads, sharper shots. Yet, many professionals overlook a simple yet critical aspect: the durability of their camera cages, especially concerning cable management. Did you know that according to a recent survey by [Creator Rig Reviews](https://rigs.creatorrigreviews.com/top-camera-cage-innovations-that-elevate-cinematography-today), over 60% of failures are caused by inadequate rig support and cable mishandling? That number is startling, but it highlights the importance of investing in the right gear.
Early in my career, I fell into the trap of opting for the most popular cage without considering its cable routing features. The mistake? I ignored how the rig’s design could cause cables to sway, tug, or even snap under strain. That oversight cost me a day of shooting repairs, lost footage, and a lesson that reinforced the value of solid, purpose-built rigs. Now, I always scrutinize cage designs, especially in relation to cable security.
Facing the Skepticism: Are These Cages Overhyped?
If you’re wondering whether investing in high-end camera cages is worth it or just another flashy trend, I get it. When I started, I thought the same—was it really necessary to drop extra cash? The truth is, the difference in build quality and cable support can be the difference between a smooth shoot and a disaster. Don’t make the same mistake I did. Quality cages, like those reviewed in our detailed analysis, are engineered to handle heavy accessories and tough conditions, preventing those dreaded cable failures.
If you’re curious about what features to look for, I recommend checking out our comprehensive guide to building your ideal cage setup. It’s packed with tips from experienced filmmakers who have faced these exact challenges. Trust me, once you’ve seen the difference quality makes, you’ll never go back to subpar support systems.
Ready to elevate your gear and eliminate those snap hazards? Let’s dive into the top three camera cages designed to withstand the rigors of professional shoots in 2026. Whether you’re tackling high-speed productions or demanding outdoor shoots, these options promise durability, cable security, and peace of mind.
Position Your Cables Strategically to Prevent Tangles
Start by planning your cable routing before assembling your rig. Use cable ties and velcro straps to bundle cables along the frame, ensuring they follow natural pathways that prevent sagging or tension points. I once spent hours troubleshooting a shaky shot caused by loose cables interfering with the lens focus; after re-routing and securing the cables with dedicated clips, the stability was instantly improved. Think of your cables as the veins of your rig—organize them for smooth blood flow and avoid unnecessary strain.
Leverage Cable Clamps and Custom Supports
Invest in heavy-duty cable clamps designed for film rigs—these clamp onto the cage or top handle, anchoring cables securely. When I built my last setup, I used rugged clamps from this collection, which prevented cables from moving during handheld shots. For specialized needs, create custom supports or mounts on your cage to hold cables away from moving parts. Think of this like installing guardrails along a winding mountain road—preventing everything from veering off course.
Implement Cable Management Accessories for Ease
Utilize cable sleeves, braided wraps, and strategically placed clips to keep everything tidy. These accessories make disassembly and adjustments quicker, saving precious time on set. In a shoot last month, I used a combination of braided wraps and magnetic clips, which allowed quick adjustments and kept cables out of the camera view—proof that simple accessories can dramatically improve your workflow.
Ensure Cable Lengths Match Your Setup
Measure your rig components precisely and use appropriately sized cables. Excess cable lengths can cause clutter and accidental pulls. During an outdoor shoot, I trimmed and secured long cables, attaching the excess to the rig with zip ties, which minimized flopping and prevented accidental disconnections. Remember, neatness equals reliability—think of your cables as plumbing: the right length prevents leaks and messes.
Regularly Test and Adjust Cable Routes
Before each shoot, simulate your entire shoot sequence, checking for tug points or slack. Adjust cable routing as your setup evolves, especially when adding accessories like monitors or microphones. On one occasion, I discovered a cable was tugging against the rig support during a test run, risking damage. Re-routing and securing it eliminated the issue, demonstrating that ongoing adjustment is key to maintaining rig integrity.
While most filmmakers focus on the obvious benefits of top handles, shoulder rigs, and camera cages, these accessories often come with subtle pitfalls that can compromise your footage and efficiency if overlooked. One of the biggest mistakes I see is assuming that all rig accessories are universally compatible or equally effective. In reality, many professionals get caught up in hype, purchasing gear that doesn’t suit their specific workflow or environment, leading to instability, added weight, or even damage over time. For instance, a popular top handle might seem sturdy, but without considering material fatigue or slip resistance, it could fail during critical shots, costing costly reshoots.
Another common misconception is believing that more accessories automatically translate to better stability. This isn’t always true. Excessive attachments can increase rig weight and imbalance, often resulting in fatigue or shaky footage. Advanced users know that strategic placement and proper balancing are paramount. For example, adding a heavy monitor without adjusting counterweights can shift the center of gravity, making handheld shots more strenuous and unpredictable. Learning to optimize your setup ensures that accessories serve your filming goals rather than complicate them.
Let’s address an advanced question: How does the choice of materials in rig components influence long-term reliability under demanding conditions? Expert insights reveal that materials like CNC-machined aluminum or carbon fiber offer superior strength-to-weight ratios, crucial for professional shoots. According to a study by the TechEd Institute on material fatigue, lightweight composites can withstand repeated stress without deformation, but cheaper plastics tend to crack or deform after sustained use. This nuance is often overlooked by amateurs who prioritize cost over durability, risking rig failure during critical moments.
Beware of the ‘oops’ factor — many filmmakers underestimate the importance of proper maintenance and regular inspections. Small cracks or loose fittings, if not caught early, can lead to catastrophic failure. Incorporating routine check-ups and understanding the signs of wear are vital, especially when using gear in harsh environments like outdoor shoots or under heavy loads.
In conclusion, mastering the intricacies of rig accessories goes beyond the basics. It requires understanding materials, balancing weight distribution, and scrutinizing the compatibility of each component within your setup. By avoiding these common pitfalls and paying attention to the subtle details, you can elevate your filmmaking efficiency and ensure reliable performance even in the most demanding scenarios. Have you ever fallen into this trap? Let me know in the comments.
Maintaining Your Camera Rig with Precision Tools
Regular upkeep of your camera rig is vital to ensure consistent performance on demanding shoots. I rely heavily on calibration tools like the V-mount battery tester to verify connections and power integrity before each shoot. Using a dedicated tool such as the Rycote Windshield Cleaner helps keep cables and connectors free of debris, preventing signal issues and ensuring clean audio and video feeds. These small investments save time and money during critical moments, and I recommend making them a staple in your maintenance kit.
Tools I Recommend for Long-Term Durability
For ongoing rig maintenance, I always keep a set of precision hex keys and nonslip pliers handy. Precision hex keys allow me to tighten loose screws—common culprits of instability—without damaging delicate parts. Nonslip pliers are invaluable for gripping and adjusting rig components, especially under tension. Additionally, a compact torque wrench helps in avoiding overtightening, which can strip threads and weaken joints over time.
Adapting Your Routine to Future Trends
As camera technology continues to evolve at a rapid pace, so does the necessity for adaptable tools. Expect to see integrations with digital monitoring devices that can analyze stress points on your rig, alerting you to potential failures before they happen. Incorporating smart diagnostic tools into your workflow can extend your setup’s lifespan and reduce downtime. Staying ahead federally will give you a significant advantage, especially when working in remote or unpredictable environments.
How do I keep my rig components in top shape over time?
Establishing a routine for cleaning, inspecting, and recalibrating is essential. I recommend scheduling weekly checks where you examine all fasteners, lubricate moving parts with appropriate oils, and replace worn components proactively. For instance, I use a silicon-based lubricant on hinges and joints—this prevents rust and maintains smooth operation. Over time, this meticulous approach prevents costly repairs and keeps your gear performing at peak capacity. Remember, a well-maintained rig not only ensures safety but also enhances shot stability and overall quality. Ready to upgrade your maintenance routine? Try integrating a professional-grade torque wrench or a calibration kit today, and experience the difference in reliability. For more expert advice, check out our comprehensive support system tips.
The Hardest Lesson I Learned About Rig Accessories and Cable Security
Early in my career, I believed that investing in premium rig accessories alone would guarantee stability and reliability. However, I soon discovered that without proper cable management and component integration, all the high-quality gear could become a liability. The pivotal moment came during a critical shoot when a cable tug caused my camera to momentarily lose focus, costing me precious minutes and footage. This taught me that even the best accessories require thoughtful planning and routine checks to truly serve their purpose.
3 Myths About Camera Rigs That Held Me Back
One common misconception I held was that heavier rigs are inherently more stable. Reality check: excessive weight without proper balance leads to operator fatigue and shaky shots. I also believed that all support gear was interchangeable, but in practice, mismatched components can cause instability. Finally, I thought cable clutter was inevitable—until I learned strategic routing and the use of quality clamps can make a huge difference. Moving past these myths allowed me to optimize my setup and boost shoot confidence.
What Experts Won’t Tell You About Building Your Rig Support System
Many seasoned filmmakers keep foundational tips close to chest—like the importance of material choice. Using CNC-machined aluminum or carbon fiber for rig components drastically improves durability and reduces fatigue. They also understand the importance of routine maintenance, such as checking fasteners and lubricating joints, which is often overlooked by amateurs. These insights, rooted in experience, have helped me maintain peak performance and avoid sudden failures during demanding shoots.
Curated Resources that Elevated My Filmmaking Game
Firstly, I highly recommend exploring the in-depth articles on building your ideal camera rig. They offer detailed insights on ergonomics and component compatibility. For quick, reliable gear insights, the latest camera cages provide tested options suitable for intense shooting days. Additionally, I rely on innovative cage features that enhance cable security and rig adaptability. These resources collectively support my goal of consistent, professional results.
Your Next Step in Elevating Support Systems
Don’t let rig-related surprises hold back your creative vision. Embrace a proactive stance—regular maintenance, deliberate component choices, and tailored cable management—to craft a support system that truly performs under pressure. Remember, the right setup not only improves your footage but also extends your gear’s lifespan. Are you ready to refine your rig support and make every shot count? Share your challenges or successes below—I’d love to hear your stories!
,
![4 Cooling Cage Mods to Stop 2026 Mirrorless Overheating [Tested]](https://rigs.creatorrigreviews.com/wp-content/uploads/2026/04/4-Cooling-Cage-Mods-to-Stop-2026-Mirrorless-Overheating-Tested-300x300.jpeg)