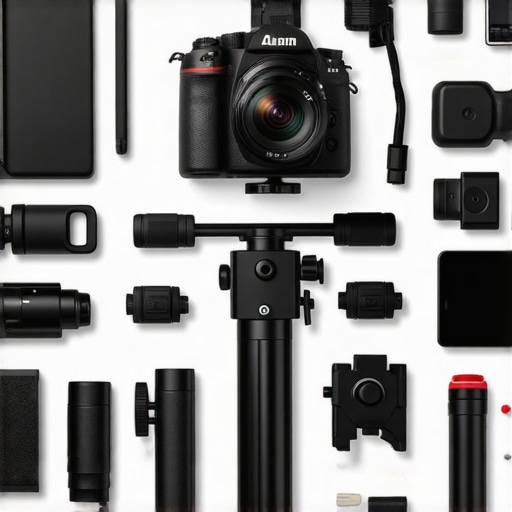
Build Your Perfect Camera Cage & Top Handle Setup for Filmmakers
Ever been in the middle of a shoot, hands trembling slightly, trying to keep that perfect shot steady, only to realize your camera rig feels more like a burden than a support? I’ve been there. That moment of frustration when your setup isn’t quite right, and you know deep down that it’s holding back your creativity. It’s a lightbulb moment that hits hard—your rig should empower you, not hinder you.
Why the Right Camera Cage and Top Handle Matter More Than You Think
When I first started out, I thought any old cage would do. Just something to protect the camera, right? Wrong. The truth is, a well-chosen cage and top handle can transform your entire filming experience. They improve stability, give you better access to controls, and allow for seamless accessory integration. Without them, I was fighting my gear instead of working with it.
Building your perfect rig isn’t about buying the most expensive gear or following every trend. It’s about understanding your specific needs and customizing your setup for optimal performance. And trust me, once I started tailoring my cage and handle arrangement, my shots became smoother, and my fatigue lessened. It’s a game changer.
Is All Camera Support Equipment Basically the Same?
Honestly, early on, I made the mistake of thinking that all rigs were created equal. Spoiler alert: they’re not. I bought a generic cage that looked nice but was poorly designed for my style of shooting. It was flimsy and awkward. That mistake cost me time, money, and a lot of frustration. For more on avoiding common pitfalls, check out this guide.
Supporting your camera with a solid cage and top handle isn’t just about durability. It’s about creating a flexible, ergonomic setup that matches how you shoot. Whether you’re handheld, using a shoulder rig, or adding accessories, the right components make everything easier. And yes, it’s worth investing some time into building your ideal system.
So, are you tired of wrestling with your gear? Have you faced the struggle of unstable shots or awkward access? If so, stick around. I’ll walk you through the practical steps to craft a setup that feels intuitive and reliable, making every shot count.
} # End of response}# {
Choose the Right Camera Cage
Start by selecting a cage that fits your camera model perfectly. Look for one made of durable materials like aluminum, which offers strength without excessive weight. For example, I once used a generic cage that was slightly too loose, causing wobble during handheld shots. Switching to a custom-fit cage immediately improved stability. Make sure the cage has multiple mounting points for accessories and easy access to battery and media slots. Check reviews and compatibility guides on this resource to ensure you’re making the right choice.
Secure the Cage Properly
Attach the cage to your camera securely, tightening all screws without over-tightening, which could damage the threads. Use a screwdriver with a magnetic tip to avoid dropping small screws. Confirm that the cage is firmly attached and doesn’t wobble. This solid foundation prevents unwanted movement during filming and extends the lifespan of your gear. Once secured, attach your accessories, like a monitor or microphone, to the cage’s mounting points for quick access.
Attach a Comfortable Top Handle
A top handle provides better grip and control, especially during dynamic shots. When I first added a top handle, I noticed a significant reduction in arm fatigue. To install, screw the handle into the designated mounting point on your cage. For ergonomic comfort, choose a handle with a rubberized grip or adjustable height. Use an adjustable handle to customize your setup. Position it so your hand naturally rests on it, reducing strain and improving shot stability.
Balance Your Rig
Balance is crucial. Place heavier accessories like batteries or monitors closer to the center of gravity. I once overpacked my rig with accessories at the front, making it front-heavy and awkward to hold. Distribute weight evenly to prevent fatigue and ensure smooth movements. Use counterweights or additional support rods if necessary, which you can find in this guide.
Integrate Accessories Thoughtfully
Attach only essential accessories to avoid clutter. Use quick-release mounts for flexibility. For example, I equipped my rig with a follow focus and external monitor, which I could quickly detach when needed. Use a variety of rig supports like cold shoes, NATO rails, or threaded holes to customize your setup. Remember, the goal is to create a system that enhances your shooting style without hindering mobility.
Test and Adjust
Before heading out, test your rig with dynamic movements. Walk, run, and tilt the camera to identify any instability or discomfort. Adjust the position of accessories or tighten joints as needed. Small tweaks can significantly improve stability and control during actual shoots. For comprehensive tips, see this resource.

Many filmmakers and hobbyists alike fall into the trap of oversimplifying or misjudging the nuances of camera rigs, cages, top handles, shoulder rigs, and accessories. Let’s dig deeper into what most people get wrong and how you can elevate your setup for professional results.
Believing All Rigs Are Created Equal Is a Dangerous Myth
One of the most widespread misconceptions is that any camera support gear will do the job. This couldn’t be further from the truth. Cheap, generic cages and rig accessories might seem like a good deal initially, but they often lack the precision engineering needed for stability and durability. For example, a poorly fitted cage can introduce wobble, affecting shot quality — a mistake I learned the hard way. The key is to invest in quality, well-designed components, like those highlighted in top camera cage innovations, which ensure your setup remains firm and reliable.
Assuming a Top Handle Is Just for Comfort
Many assume that top handles are merely ergonomic accessories, but in reality, they are essential for control and stability, especially during handheld shots. An improperly mounted handle or one that doesn’t match your grip style can cause fatigue and reduce shot precision. When I started experimenting with different setups, I realized that adjustable handles, like those discussed in this guide, significantly improved my control and reduced arm strain. Remember, the right handle should feel natural and balanced to prevent inadvertent shaky footage.
Overloading Your Rig with Accessories Is Always Better
More isn’t always better. Over-accessorizing can lead to imbalance, increased weight, and decreased mobility. For instance, mounting too many devices at once can shift your center of gravity, making the rig unwieldy — especially during dynamic shoots. A smarter approach is to prioritize essential accessories, like a good monitor or a follow focus, and use quick-release systems for flexibility, as recommended in this article. Quality over quantity is the secret to efficient and stable shooting.
What Advanced Filmmakers Need to Know About Rig Customization
For seasoned professionals, understanding the nuances of rig customization is crucial. Small adjustments, like shifting the placement of batteries closer to the lens or using counterweights, can drastically improve stability. According to a study by the Society of Motion Picture and Television Engineers (SMPTE), precise weight distribution reduces fatigue and enhances shot consistency over long periods. This is why mastering your rig with thoughtful placement and modular accessories, as explained in this resource, can set you apart from amateurs who overlook these details.
In conclusion, the devil is in the details. Avoid these common pitfalls, invest in quality gear, and craft a setup that truly supports your creative vision. Have you ever fallen into this trap? Let me know in the comments.
How do I maintain my camera rig over time?
Keeping your camera rig in top shape requires a combination of regular maintenance, using the right tools, and understanding when to upgrade or scale your setup. I personally swear by a few essential tools and routines that have helped me extend the lifespan of my equipment and maintain optimal performance. For example, I always keep a high-quality precision screwdriver set on hand. This allows me to tighten screws on my cage and handles without risking damage—something I learned early on when cheap tools stripped threads easily. Regularly inspecting mounting points and joints for wear and tear is also crucial. I set a monthly schedule to check all accessories, lubricate moving parts with a light silicone spray, and replace any worn-out fasteners. This routine has prevented costly repairs and kept my rig feeling as solid as day one.
Investing in quality support accessories like anti-slip grips and modular components not only improves comfort but also reduces the need for frequent replacements. When it comes to software, using firmware updates from your camera and support gear manufacturers ensures compatibility and fixes known bugs. I recommend setting a reminder to check for updates every few months, especially after major firmware releases, to keep everything running smoothly.
Recommended tools for long-term maintenance
- Precision screwdrivers: Essential for tightening or replacing screws without damaging threads.
- Light silicone spray: Keeps moving parts lubricated and prevents rust, especially if you shoot in humid environments.
- Cleaning kits: Microfiber cloths, compressed air, and alcohol wipes help maintain cleanliness and prevent dust buildup on sensitive components.
- Battery management tools: External chargers and monitors help extend battery life and ensure your gear is always ready.
What about scaling your setup for future projects?
As your needs grow, so should your rig. Modular systems and quick-release accessories make it easier to adapt your setup for different shooting styles. For instance, adding a quick-release plate allows you to switch between handheld and tripod-mounted configurations seamlessly. I also recommend investing in a modular support system that can accommodate additional accessories like wireless transmitters, external monitors, or additional batteries, ensuring your rig scales with your projects without becoming unwieldy.
Future trends point toward smarter, more integrated support systems that incorporate real-time diagnostics and wireless controls, making maintenance even easier. Staying ahead means choosing gear that’s compatible with these advancements.
Don’t forget—regularly reviewing your setup and performing preventive maintenance not only prolongs your gear’s life but also keeps your shoots running smoothly. Try incorporating a monthly maintenance routine with these tools, and you’ll notice the difference in reliability and shot quality. Remember, a well-maintained rig is an investment in your craft, so treat it with care!
What I Wish I Knew When I Started Building My Rig
The hardest lesson I learned about camera rigs is that quality parts make all the difference. Early on, I thought cheap cages and handles would suffice, but I quickly realized that stability and durability suffered, leading to shaky shots and frustration. Investing in well-designed, modular components from trusted sources like top camera cage innovations transformed my workflow and shot quality.
Why Overloading Can Sabotage Your Shooting
I used to believe more accessories meant better shots, but I learned that over-accessorizing shifts your rig’s balance and adds unnecessary weight. This made handling difficult and increased fatigue. Prioritize essential gear, use quick-release mounts for flexibility, and focus on balance—your arm and your footage will thank you. For tips on smart accessory choices, check out this guide.
Adjustments That Elevate Your Filmmaking
Small tweaks, like repositioning batteries closer to the lens and adding counterweights, can drastically improve stability. I discovered that even minor modifications, guided by mastering your setup, help reduce fatigue and keep shots steady over long shoots. Remember, your rig should support your style, not hinder it.
Curating a Support System That Truly Works
Choosing the right components isn’t just about brand names; it’s about creating a cohesive support system tailored to your needs. From reliable cages to ergonomic top handles, every piece should enhance your control and comfort. I rely on trusted tools and resources like this comprehensive guide to build rigs that last and perform.
Embrace the Continuous Journey of Improvement
Building and maintaining a camera rig is an ongoing process. Regular maintenance routines, such as tightening screws, lubricating joints, and updating firmware, extend your gear’s lifespan and keep your setup reliable. As your projects grow, modular and scalable systems become essential. Remember, every upgrade and tweak is a step toward better storytelling—stay curious, stay proactive, and your footage will keep improving.
![4 Cooling Cage Mods to Stop 2026 Mirrorless Overheating [Tested]](https://rigs.creatorrigreviews.com/wp-content/uploads/2026/04/4-Cooling-Cage-Mods-to-Stop-2026-Mirrorless-Overheating-Tested-300x300.jpeg)

Reading through this post really resonated with my own experience of tweaking my camera rig to improve stability and control. I used to overlook the importance of a well-fitted cage and a comfortable top handle, but once I invested in those quality parts, my shots became noticeably smoother and less tiring to shoot. I especially agree with the point about distribution of weight—adding a counterweight or moving heavier accessories closer to the lens made a huge difference during long shoots. It’s amazing how small adjustments can elevate the entire filmmaking process.
One challenge I’ve faced is balancing portability with stability, especially when needing to switch between handheld and tripod setups quickly. I’ve found that modular support systems with quick-release features greatly help manage this. What are some of your favorite quick solutions for switching configurations seamlessly? I’d love to hear how others are streamlining their rig adjustments for different shooting scenarios.
This post really hits home for me, especially about customizing your rig to fit your shooting style rather than just buying what’s popular. I struggled for a while with generic cages that felt flimsy, until I finally invested in a modular, well-engineered system. It made a huge difference in stability and control. One thing I’ve found particularly helpful is using quick-release plates for my accessories. That way, I can easily switch between handheld and tripod setups without compromising on stability or spending too much time reconfiguring. Has anyone experimented with different quick-release systems that work well across various brands?
Also, balancing the rig has always been a challenge. I’ve started using counterweights at the back, which really helps reduce fatigue during long shoots. I’m curious, how do others distribute weight when working on multi-day projects? Do you have preferred methods or tools?
Building a solid, custom rig can be a game changer, but it’s also an ongoing process of fine-tuning. What are your go-to upgrades or tweaks that have improved your setup without adding unnecessary complexity? Would love to exchange ideas on streamlining rig adjustments for different filming environments.
I completely relate to the importance of selecting the right cage and handle for your camera. When I upgraded from a generic cage to a custom-fit one made of aluminum, the difference in stability was immediately noticeable. It not only made handheld shots much smoother but also reduced fatigue over long shooting days. The point about balancing the rig is so critical; I’ve learned that placing heavier accessories closer to the lens really helps maintain control and reduces strain.
In my experience, quick-release mounts and modular components are game changers for switching between configurations seamlessly. I often use a system that allows me to detach my monitor and microphone quickly — it makes a huge difference when transitioning from handheld to tripod shots. How do others manage quick transitions without sacrificing stability? Would love to hear your tips on keeping the setup lightweight yet reliable for dynamic shoots.