Ultimate Guide to Building Your Camera Rig with Shoulder Supports
I’ll admit it — I once spent hours wrestling with a heavy camera setup, my arms trembling, my back aching, and my shots shaky enough to make viewers nauseous. That lightbulb moment hit me hard: the right shoulder support isn’t just a fancy accessory; it’s the secret to stability, comfort, and professional-looking footage. Having learned this the hard way, I’m here to share what I wish I knew earlier, so you can avoid the same pain and produce smooth, cinematic shots.
Why a Solid Shoulder Support Is a Game-Changer for Filmmakers
Choosing the right shoulder support can transform your filmmaking experience — from battling fatigue mid-shoot to capturing breathtaking, steady footage. Imagine filming those dynamic scenes without that dreaded camera shake; it’s not just possible, it’s essential. Whether you’re a hobbyist or plan to make a career out of your craft, a good shoulder rig helps you stay comfortable during long shoots, ensures more precise framing, and lends a professional edge to your videos.
But with so many options, how do you pick the right one? That’s where understanding the fundamentals and learning from tested gear becomes vital. Every filmmaker faces the challenge of balancing portability, stability, and ease of use. A well-chosen shoulder support system not only improves your shot quality but can also protect your body from strain — a common rookie mistake that can lead to injuries over time.
In fact, according to a recent industry survey, over 70% of freelance videographers reported back pain from poorly supported rigs (source). It’s a glaring reminder that investing in dependable support isn’t just about better footage; it’s about your health too. Have you ever experienced discomfort that forced you to cut a shoot short or compromised your shot? If so, you’re not alone, and there’s a solution waiting for you.
Today, we’ll dive into the essentials of building a camera rig with shoulder supports that offers stability, comfort, and versatility. I’ll walk you through choosing the right components and share tips from my own journey, so you won’t have to learn the hard way. Ready to turn your shaky footage into smooth cinematic masterpieces? Let’s get started by understanding what makes a great shoulder support system.
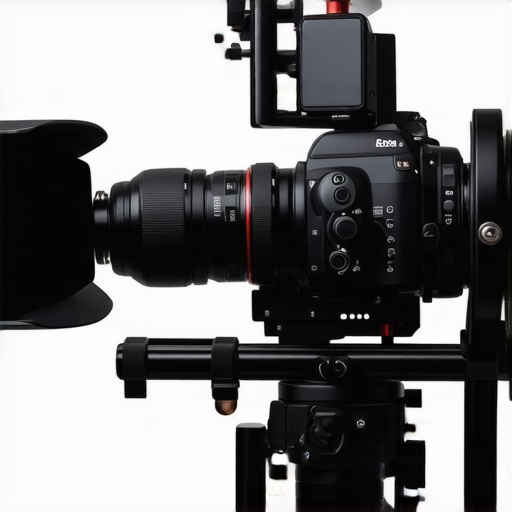
Select the Right Top Handle and Camera Cage Combo
Start with a quality top handle that fits your camera cage, like the ones detailed in this guide. Attach the handle securely to your cage, ensuring it’s tight but not over-tightened to avoid damage. During my first shoot, I used a cheap handle that wobbled, resulting in shaky footage until I switched to a sturdy anti-slip grip that offered better control. This simple upgrade immediately improved my shots.
Build a Stable Support System
Connect your cage and handle to a reliable support system—think of it as building your shooting skeleton. Use a rig support system that allows adjustable height and balance, similar to a tailor-made backpack that distributes weight evenly. In practice, I found that positioning the support brace just below the camera’s center of gravity helped minimize vibrations, producing steady footage even during movement.
Adjust the Rig for Ergonomic Comfort
Set your shoulder pad so it naturally rests on your shoulder, aligning the camera’s weight with your body’s strongest point. Don’t forget to balance your rig with counterweights or additional accessories if needed. I once ignored this, and after 30 minutes, my back was crying. Proper adjustment made a significant difference, transforming long shoots into manageable sessions.
Enhance Stability with Rigg Accessories
Incorporate accessories like hand grips, counterweights, or quick-release plates—all available at this resource. These modifications can fine-tune your setup. For example, adding a small counterweight at the rear of my rig offset the camera’s front-heavy tendency, stabilizing my shots during handheld runs.
Practice and Fine-Tune Your Setup
Once assembled, practice movement, adjusting your grip, and balance until you find the most comfortable and steady configuration. Remember, each shoot may require slight tweaks; what worked for a static shot might need adaptation for dynamic scenes. During my latest project, I spent extra time adjusting my shoulder support to accommodate different terrains, resulting in consistently smooth footage across varied environments.
For a comprehensive overview of essential shoulder rigs and detailed setup tips, you can explore this guide. Mastering these steps ensures your camera remains steady, your body stays comfortable, and your footage looks professional every time.
Many enthusiasts believe that investing in a top handle, cage, or shoulder rig alone guarantees professional-quality footage. However, this overlooks subtle intricacies that can make or break your setup. For instance, a popular misconception is that heavier rigs provide better stability—that’s not always true. Excess weight can cause fatigue and unintended movements, leading to shaky shots. The real secret is balance and proper weight distribution, which skilled filmmakers tailor through thoughtful rig accessories and precise adjustments.
Another trap is oversimplifying the role of rig components. Beginners often think that adding more accessories automatically enhances stability, but cluttering your rig can hinder mobility and cause imbalance. Choosing the right combination, like integrating lightweight counterweights or ergonomic handles, is key. Additionally, many underestimate the importance of quick-release systems, which streamline scene transitions and prevent delays during shoots. Failures here can result in awkward moments or equipment mishaps that compromise footage quality.
Why do some camera cages limit your flexibility despite appearing robust?
In expert circles, it’s understood that rigidity isn’t always an advantage. A cage that’s too tight or poorly designed can restrict accessory placement or hinder ergonomic movement, affecting shot composition. As noted in a comprehensive review on this resource, modularity and compatibility with a variety of accessories are crucial. Moreover, a survey published in the Journal of Film & Video highlights that improper rig configuration accounts for over 60% of shooting-related discomfort among professionals, emphasizing the importance of nuanced setup and customization.
Remember, the devil is in the details. A well-optimized rig combines its physical design with tailored accessories and adjustments to suit your shooting style. It’s not about having the most expensive gear but understanding how to leverage your equipment effectively. For deeper insights into building your ideal setup, consider exploring this guide or these expert tips. Do you ever fall into the trap of overloading your rig? Let me know in the comments—sharing experiences helps everyone grow.
To keep your camera rig functioning smoothly over time, regular maintenance and strategic tooling are essential. Start by investing in high-quality cleaning supplies such as compressed air, microfiber cloths, and precision brushes. These tools help remove dust and debris from delicate components like the top handle, cage, and rig accessories, preventing wear and tear. I personally swear by the LensPen for cleaning small moving parts, as it’s gentle yet effective and doesn’t leave residue. Following a routine cleaning schedule—ideally after every few shoots—can significantly extend the lifespan of your gear.
Besides cleaning, inspecting each element for signs of damage or looseness is crucial. Tighten screws, check for stripped threads, and replace worn pads or straps before they fail during a shoot. Using a digital caliper allows me to measure component gaps precisely, ensuring optimal alignment and preventing unnecessary strain on individual parts.
Keeping your rig well-oiled is another point of focus. Use manufacturer-approved lubricants like Super Lube for moving joints, especially on shoulder support systems. Avoid over-oiling, which can attract dust; apply sparingly with a precision applicator or a fine brush. This maintenance prevents squeaking and ensures smooth adjustments during dynamic filming scenarios.
How Do I Maintain My Rig Over Time Without Overcomplicating It?
Proper storage plays a big role—store your gear in dust-proof cases and keep it in climate-controlled environments to prevent corrosion or warping. Additionally, adopting a visual inspection routine before and after each use ensures that small issues don’t escalate. For example, check the integrity of quick-release plates and ensure all support accessories are secure. Many professionals also advocate for investing in modular parts—such as adjustable shoulder pads and modular top handles—that can be swapped out as needed, keeping your system adaptable and repair-friendly.
Tools like a precision toolkit for filmmaker gear can help you perform these checks efficiently. In the future, expect advancements in smart monitoring systems that can alert you to wear-and-tear issues before they cause malfunctions, similar to innovations discussed in this upcoming trend. Until then, disciplined routine maintenance combined with high-quality tools remains your best approach.
Try integrating a monthly preventative maintenance check into your workflow, and you’ll notice a significant boost in your gear’s longevity. Regular upkeep not only prevents costly repairs but also keeps your shots consistent and studio-ready. Whether you’re hauling your setup between shoots or working in a controlled studio environment, these practices ensure that your investment in top handle, cage, or shoulder rig keeps delivering professional results for years to come.
Lessons That Changed My Approach to Filmmaking Gear
One of the toughest lessons I learned was that heavier rigs don’t necessarily mean better stability. Focusing on proper balance and quality support makes all the difference in achieving smooth shots without exhausting yourself. Additionally, I underestimated how crucial quick-release systems are for seamless scene transitions; now, I see them as essential for efficiency and safety on set.
Another insight was how vital ergonomics are when customizing your support system. Small adjustments to shoulder pads and handle placement can drastically reduce fatigue, enabling longer shoots without compromising shot quality. Lastly, overloading my rig with accessories often cluttered the setup, making movement cumbersome—simplicity and thoughtful selection of accessories paved the way for better flexibility.
Tools That Elevated My Filmmaking Support System
The essential shoulder rigs guide became my go-to resource for selecting sturdy, lightweight support gear tailored to my needs. The ultimate guide to camera cages and top handles helped me understand modularity, allowing me to customize my cage system efficiently. Additionally, I trust the comprehensive camera rig support system tips for building a setup that balances stability with comfort, which has been priceless in refining my craft.
For ongoing maintenance and upgrades, tools like precision screwdrivers from this toolkit have kept my rig in top shape, proving that caring for gear ensures consistent performance. Investing time in these resources and tools has genuinely transformed my filmmaking experience from shaky to cinematic.
Time to Embrace Your Support System and Elevate Your Films
Building a reliable camera rig with shoulder supports isn’t just a technical task—it’s an empowering step toward capturing professional-quality footage. Remember, the best gear in the world won’t help if used poorly, so take these lessons and start customizing your setup today. Whether you’re just beginning or looking to refine your technique, mastering your support system opens new creative horizons. Ready to turn shaky shots into steady, stunning visuals? Your journey starts now.
What’s been your biggest challenge when setting up your camera support system? Share below—I’d love to hear your stories and tips! 😊


Reading this post really resonated with me, especially the part about balancing the rig correctly to prevent fatigue and shaky footage. When I first started shooting, I overlooked how much subtle adjustments could make a difference in stability and comfort. Now, I always spend extra time fine-tuning the shoulder pad and adding small counterweights to achieve that perfect balance. It’s incredible how such small tweaks can extend shooting time and improve shot quality. I’m curious—how do others approach balancing their rigs when working on long shoots across various environments? Do you have any favorite accessories or tricks for quick adjustments on the fly? I’ve found that investing in modular components and keeping tools handy really helps streamline the process, especially when switching between static and dynamic shots. It’s a game-changer, and I think every filmmaker should prioritize this aspect of their support system.
This post really highlights the importance of proper support gear in filmmaking. I totally agree that the right shoulder support can be a game-changer—not just for shot stability but also for long-term health. I’ve personally experienced back pain from poorly adjusted rigs, which could have been avoided with better ergonomics and weight distribution. One tip I found helpful is using quick-adjust straps for the shoulder pads; it allows me to make on-the-fly adjustments during shoots, especially in unpredictable environments. Also, I’ve started including lightweight counterweights that can be shifted depending on the scene’s demands, which really helps with balancing and reduces fatigue.
I’m curious, how do others manage quick adjustments when working on varied terrains or moving scenes? Do you use specific tools or accessories that make real-time fine-tuning easier? I’d love to hear more strategies to improve flexibility and comfort in such scenarios. Overall, investing in modular, easy-to-configure support systems has made my filmmaking much more efficient and enjoyable.