Build Your Perfect Camera Cage & Top Handle for Steady Filmmaking
I still remember that shoot vividly. I was dragging my heavy camera rig across a bustling city street, trying to get that perfect shot, when suddenly, my top handle slipped. The camera jerked, ruining a crucial scene. At that moment, I realized—no matter how good your camera or lens, if your rig isn’t properly built, your shots suffer. That lightbulb moment changed everything for me. I dove deep into understanding how to build a camera cage and top handle that actually supports my filming style. If you’ve ever felt frustrated with unstable shots or awkward setups, you’re not alone. Today, I’ll show you how to create a custom rig that gives you both stability and flexibility, turning chaos into cinematic magic.
Why Your Camera Rig Matters More Than You Think
When I first started, I thought a basic setup would do. Boy, was I wrong. Early on, I made the mistake of underestimating the importance of a sturdy cage and well-designed top handle. I used a generic rig that looked good but didn’t support my movements, leading to shaky footage and sore arms. It wasn’t until I invested in a proper build that my shots became smoother and more professional. The right rig doesn’t just hold your gear; it becomes an extension of your body, allowing you to move freely without sacrificing stability. Plus, a well-assembled cage can be customized with accessories—like battery packs, monitors, and microphones—which I highly recommend checking out in this latest accessory guide.
Is Building Your Own Camera Cage Really Worth It?
My early mistake was assuming I could buy a one-size-fits-all rig and be done with it. Spoiler: it doesn’t work that way. A custom build might seem daunting at first, but it’s the best way to ensure your gear fits perfectly and your rig supports your unique filming style. Plus, it’s surprisingly cost-effective compared to buying a high-end ready-made setup. If you’re worried about the complexity, don’t be. I’ll walk you through the essential steps to assemble your own system, ensuring you get a setup that’s both durable and adaptable.
Now, you might be asking: “Is all this really necessary?” Well, recent studies show that stabilizing equipment can significantly improve shot quality—something that’s crucial whether you’re creating content for social media or professional filmmaking. And trust me, the difference is night and day.
Are you tired of shaky footage and uncomfortable rigs? If so, stay with me. We’re about to dive into the practical steps that will turn your camera setup into a powerhouse of stability and creativity. Ready to build your perfect camera cage and top handle? Let’s go!
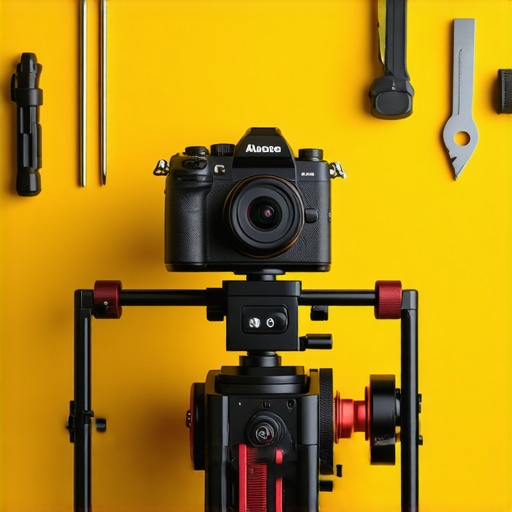
Start with the Right Foundation
Building a camera cage is like assembling the chassis of a race car; it provides the support, rigidity, and customization options needed for professional filmmaking. Begin by selecting a cage that fits your camera model precisely—universal rigs often lead to instability. Once you have your cage, secure it firmly to your camera using the appropriate screws, ensuring no wobble. During my first attempt, I used a generic cage that was slightly too loose, resulting in shaky footage until I realized the importance of a snug fit. Invest in high-quality screws and tools to avoid stripping or damaging your gear.
Choosing and Installing a Top Handle
The top handle is your primary control point for smooth shots. Think of it as the steering wheel of a vehicle—your grip, balance, and maneuverability depend on it. Pick a handle with a comfortable grip and multiple mounting points for accessories. Attach it to the cage’s mounting threads using an Allen key, ensuring it’s tight but not over-tightened. I learned this the hard way when I over-tightened and stripped the thread; now, I always check for a firm, stable connection before filming. For added versatility, consider handles with built-in cold shoes or 1/4-inch threads for microphones, monitors, or lights. Check out the latest top handle accessories for enhanced support.
Enhancing Stability with Shoulder Rigs
Adding a shoulder rig transforms your handheld setup into a stable platform, reducing fatigue and shaky footage. Think of it as a harness that distributes weight and offers extra points of contact. Attach the shoulder pad to the rig’s support rods, adjusting height to match your body. Secure the rig to your camera cage with quick-release clamps or screws. During a recent shoot, I used a shoulder rig with a sliding mechanism to balance my heavier lens—this kept my shots steady even during long takes. For best results, customize your setup with counterweights or additional grips. Explore the shoulder rig essentials to find the perfect balance.
Adding Accessories for Support and Flexibility
Accessories like monitors, microphones, and batteries can be mounted on the cage or handle. Think of accessories as the gadgets in your toolkit—each adds functionality. Use cold shoe mounts, 1/4-inch threads, or dedicated brackets to secure items firmly. During my project, I added a small monitor on a top handle extension, which improved framing and focus. Be mindful of weight distribution; excessive accessories can make your rig unwieldy. For a comprehensive list of must-have rig accessories, check the latest offerings and select those that enhance stability without adding bulk.
Fine-Tuning for Perfect Shots
Once assembled, test your rig with a few practice shots. Adjust the positioning of handles, shoulder support, and accessory placement for comfort and balance. Use a tripod or steady surface to identify any wobble or imbalance. During a recent shoot, I spent extra time fine-tuning my setup, which resulted in noticeably smoother footage. Remember, a well-tuned rig is your best friend in dynamic shooting environments. For expert tips, visit optimization guides to elevate your filmmaking.
Many enthusiasts assume that simply purchasing a camera cage, top handle, or shoulder rig will instantly elevate their filmmaking. However, the reality is that most people get some critical nuances wrong, which can compromise stability, flexibility, and overall shot quality. Let’s dig deeper into what often goes unnoticed and how to avoid these pitfalls to truly optimize your setup.
Why a One-Size-Fits-All Rig Might Be Your Biggest Trap
Contrary to popular belief, buying a generic, universal camera cage or rig often leads to issues down the line. These off-the-shelf solutions may seem convenient but rarely fit your specific camera model or shooting style perfectly. This mismatch can cause instability, added weight in awkward areas, or limited accessory options. A tailored approach, such as custom-building your cage and selecting precise mounting points, ensures your gear stays secure and balanced. For an in-depth guide on customizing your setup, check out this comprehensive guide.
Beware of Overloading Your Rig with Accessories
It’s tempting to add every accessory—monitors, lights, microphones—on your rig. But this often leads to excessive weight and poor balance, which can cause fatigue and shaky footage. The key is to choose accessories thoughtfully and distribute weight evenly. Use supportive support systems that complement your shooting style without overburdening your setup. Remember, more is not always better; strategic placement matters more than quantity.
What Advanced Filmmakers Know About Rig Stability That Beginners Miss
One common myth is that tight screws and sturdy materials alone guarantee stability. While important, advanced users understand that proper weight distribution, balanced center of gravity, and ergonomic setup are equally vital. For instance, adjusting the position of your top handle and shoulder support to match your body’s natural posture prevents fatigue and reduces vibrations. This nuanced balance can make the difference between a shaky shot and cinematic smoothness. For insights from industry experts, see this expert advice.
Moreover, many overlook the importance of regular maintenance and fine-tuning of their rigs, which can deteriorate over time and affect shot quality. Tightening screws, rebalancing accessories, and testing your setup before shoots can save you from costly mistakes. Have you ever fallen into this trap? Let me know in the comments.
Keeping your camera rig in top shape isn’t just about assembling a sturdy setup; it’s also about ongoing maintenance and using the right tools to ensure long-term performance. Regular checks and proper care can save you time and money while keeping your shots smooth and professional. Today, I’ll share the specific tools I personally swear by and the maintenance routines that keep my camera rig functioning flawlessly over time.
How do I maintain my camera rig to ensure it stays reliable?
First, I always keep a set of high-quality Allen wrenches and screwdrivers handy. Over time, screws on handles, cages, and support systems can loosen due to vibration or frequent assembly/disassembly. Using precision tools like the best rig accessories ensures I don’t strip screws or damage threads. I prefer magnetic screwdrivers for quick, secure work without losing tiny parts. Additionally, I carry a microfiber cloth and some isopropyl alcohol to clean contact points and prevent corrosion, especially if I shoot in humid environments.
Beyond physical cleaning, I regularly inspect the integrity of mounting points and quick-release clamps. A loose clamp could cause catastrophic gear failure during a shoot. For this, I use a small torque wrench designed for camera equipment—this helps me tighten screws to manufacturer specifications without over-tightening, which can damage threads. This kind of routine checkup is crucial for preventing wear and tear that can degrade shot stability over time.
What tools do I recommend for long-term rig maintenance?
The most essential tool in my kit is a digital caliper. It allows me to measure mounting points and ensure that every component remains within tight tolerances, especially after transport or prolonged use. If I notice any play or looseness, I immediately address it to prevent shot instability. I also utilize a portable multimeter to check electrical connections if I’ve integrated powered accessories. Reliable power connections are vital; a loose or corroded contact can cause flickering monitors or microphone issues during filming.
For cleaning contacts and delicate electronics, I rely on contact cleaner sprays designed specifically for camera gear. Avoiding dust and oxidation on connectors prolongs the lifespan of expensive accessories like monitors and wireless transmitters. To keep the rig balanced, I carry a small set of weights and balancing tools, which help me fine-tune the setup after assembly or transport.
Looking ahead, what’s the future of rig maintenance and tools?
As camera systems become more advanced, I predict a shift towards integrated smart diagnostics—think sensors embedded in rig components that alert you to loosened screws, voltage irregularities, or material fatigue. This proactive approach could revolutionize how we care for our gear, reducing downtime and preventing damage before it happens. For now, though, consistent manual checks and quality tools are your best bet.
Don’t forget—regular maintenance isn’t just about preservation; it’s about enhancing your filmmaking experience. Try incorporating a routine check with a torque wrench and caliper into your setup process. These small steps can make a big difference in maintaining your rig’s stability and performance over the years. To explore more about essential rig accessories that support long-term durability, visit this detailed guide.
The Hardest Lesson I Learned About Camera Rigs
One of my biggest surprises was realizing that even the most expensive camera gear can falter if the support system isn’t properly tailored. I once used a generic cage that fit my camera model but caused more wobble during handheld shots. That lightbulb moment pushed me to customize my rig, which dramatically improved my stability and overall footage quality. It taught me that personalizing your gear isn’t just a luxury—it’s a necessity for professional results.
Why Cutting Corners on Rig Accessories Will Cost You
Initially, I thought I could save money by skipping high-quality support accessories. But cheap mounts and flimsy handles quickly failed under stress, leading to shaky shots and even gear damage. Investing in robust, well-designed accessories like adjustable top handles and support rods has been a game-changer. These elements distribute weight evenly and give you the flexibility needed for complex shots, proving that quality support gear is essential for cinematic success.
What Industry Veterans Keep Quiet About Rig Maintenance
Many seasoned filmmakers understand that a rig’s longevity depends on regular upkeep. I learned this the hard way when a loose screw caused my monitor to fall mid-shoot. Now, I always carry a set of precision tools and perform quick inspections before every shoot. This proactive approach prevents unexpected failures and ensures my setup remains reliable, even after months of heavy use. Regular maintenance, including tightening screws and cleaning contacts, is the silent hero behind smooth filmmaking.
Curated Resources for Building Your Dream Support System
For crafting a rig tailored to your needs, I highly recommend exploring this comprehensive guide. It offers detailed steps to assemble a durable, lightweight support system. Additionally, this resource highlights the best accessories that enhance stability and versatility. Lastly, don’t forget to check out the top accessories list for ideas on expanding your setup without sacrificing mobility.
Your Turn to Elevate Your Filmmaking Game
Building a custom camera rig isn’t just about gear—it’s about empowering your creative vision with stability and comfort. I encourage you to experiment, fine-tune, and invest in quality support accessories. Remember, a well-supported camera setup transforms shaky footage into cinematic magic, making your stories shine brighter. Ready to take your filmmaking to the next level? Dive into the resources and start customizing your support system today!
What’s been your biggest challenge in setting up your camera support gear? Share your experience below—I’d love to hear your story!
,
![4 Cooling Cage Mods to Stop 2026 Mirrorless Overheating [Tested]](https://rigs.creatorrigreviews.com/wp-content/uploads/2026/04/4-Cooling-Cage-Mods-to-Stop-2026-Mirrorless-Overheating-Tested-300x300.jpeg)

Reading this post really resonated with me, especially the part about the importance of a tailored rig over generic setups. When I started out, I also bought an off-the-shelf cage, which caused a lot of instability during handheld shoots. It wasn’t until I invested in customizing my support system that I saw a dramatic improvement in my footage’s steadiness. I think one overlooked aspect is how different filming styles demand different rig configurations. For example, I prefer lightweight rigs for mobility, but that sometimes sacrifices stability, especially with heavier lenses. Have others found a sweet spot between lightweight design and stability? Also, I’ve become a fan of using quick-release clamps because they make switching accessories easier without compromising security. It’s amazing how small adjustments can lead to big improvements. What adjustments or accessories have you found most helpful in your setup for maximizing stability and comfort?
This post hit close to home for me. I remember the chaos of my first shoot where my top handle slipped and nearly ruined my shot. Since then, I’ve started customizing my rig for each project, focusing on proper weight distribution and snug fittings. What stands out is how even slight tweaks in the placement of accessories or the tension on screws can make a huge difference in stability. I’ve found that adding counterweights to my shoulder rig really helps balance the entire system, especially during extended shoots. Does anyone have tips on balancing heavier lenses or external monitors without sacrificing mobility? Also, I’ve been considering upgrading to quick-release clamps for easier setup changes. Have others experienced a noticeable difference in workflow and stability from this? It’s fascinating to see how personalized rigs can elevate filmmaking quality, and I’d love to hear your best customization tips or stories of how small improvements made a big impact.