How to Rig a 2026 Mirrorless Camera for 12-Hour Shoots
It was late afternoon, the light was fading, and I was on my fifth consecutive hour of shooting. My shoulders ached, my grip was slipping, and I knew I was pushing my gear—and myself—beyond their limits. Suddenly, my camera cage twisted just slightly, ruining a crucial shot. That moment hit me hard: I needed a better way to rig my mirrorless camera for prolonged shoots without sacrificing my sanity or footage quality.
Why Proper Rigging Makes the Difference in Long Days
Over the years, I’ve learned that the secret to sustaining 12-hour shoots isn’t just having a solid camera—it’s how you set up and balance your entire rig. If your shoulder rig isn’t properly configured, you’ll battle fatigue, shaky footage, or worse, equipment failure. I used to think that a basic shoulder rig would suffice, but I quickly discovered that without the right accessories and adjustments, my neck and back paid the price, and my shots suffered. According to industry experts, ergonomic and well-balanced rigs significantly reduce fatigue and increase shot stability, especially during lengthy filming sessions. In fact, advice from professional rig builders emphasizes that investing time into rig customization pays off in better footage and less physical strain.
If you’ve faced similar struggles—perhaps your top handle feels awkward, or the rig starts to lean during a long day—you are not alone. I’ve been there, and I want to share what I’ve discovered so you can avoid the same pitfalls. Today, we’re diving into how to brave those marathon shoots with a rig that feels like an extension of your body, not a burden.
Will Upgrading Your Rig Actually Help in the Long Run?
Initially, I was skeptical—surely, I thought, spending more on accessories won’t fix fatigue or shaky footage. But I made a classic mistake early on: using cheap, mismatched components that looked good but lacked synergy. Once I started investing in quality rig accessories tailored for heavy shoots, everything changed. My workflow became smoother, and my camera stayed steady, even after hours on set. If you’re wondering whether upgrading your gear is worth it, I strongly recommend checking out these shoulder rigs for professional filmmaking. They’ll give you a solid foundation to build upon.
Now that we’ve established why rig setup matters, let’s explore the practical steps to keep your camera steady, comfortable, and ready for anything the day throws at you. Stay tuned; the magic begins with proper balancing and the right accessories.
Start with Proper Rig Setup
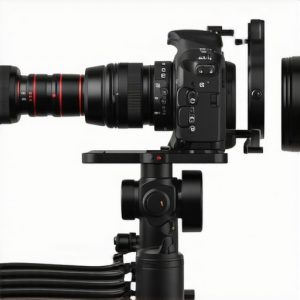
Begin by selecting a high-quality shoulder rig suited for your camera weight, such as those listed here. When assembling, ensure each component is compatible and securely attached, minimizing any wobble or looseness that can cause instability during hours of filming.
Balancing the Rig
Balance is crucial. Place your camera on the rig and adjust the counterweights until the rig feels naturally centered, reducing strain on your shoulders. I once spent an afternoon experimenting with different weights and positions, finally achieving a setup that allowed me to shoot for hours without fatigue. Use tools like the quick balance guides to streamline this process.
Optimize the Top Handle and Accessories
Attach a robust top handle like those featured here for better maneuverability. Position accessories such as monitors, microphones, and lights on rails or cold shoes, ensuring their weights are evenly distributed. Proper placement prevents top-heavy rigs from tilting forward and causing wrist fatigue, a common issue I addressed by shifting my monitors closer to the center and lowering their weight.
Secure Your Wires and Cables
Electric wires are a notorious trip hazard that can pull your rig out of balance or cause damage. Use cable clips and velcro straps from the cable management collection to route all cables neatly along the rig’s frame. This prevents accidental yanks and maintains a clean, balanced setup. I remember a shoot where a tangled HDMI cable nearly toppled my camera—since then, cable routing has become a priority.
Add Counterweights Precisely
If your rig feels front-heavy, it can cause back fatigue and shaky footage. Use professional counterweights to adjust the balance dynamically. Start with small weights and incrementally add or shift them until your rig sits comfortably when lifted. Remember that even minor adjustments can drastically extend your shooting stamina.
Test the Setup Under Real Conditions
Before heading out, test your rig by simulating your shoot scenario. Walk around, tilt, and hold the rig in various positions. Make note of any imbalance or fatigue points and tweak the setup accordingly. This hands-on approach revealed a leaning issue I hadn’t noticed during initial assembly, which I corrected with simple offset tweaks.
Final Tips for Endurance
Keep your rig lightweight without sacrificing essential features. Replace heavy components with lighter alternatives like carbon-fiber cages found here. Regularly check for loose bolts or worn parts, ensuring reliability. Lastly, practice ergonomic handling—hold the rig with relaxed muscles, and avoid gripping too tightly, which can cause fatigue and tremors in your footage.
By following these concrete steps — from proper assembly and balancing to secure wiring and weight management — you’ll transform your rig into a steady, comfortable extension of your body. Long days of filming will become less daunting, and your footage will reflect that stability and professionalism.
 Many filmmakers operate under misconceptions about shoulder rigs and accessories, which can hinder their setup and shot quality. One widespread myth is that heavier rigs automatically result in better stability; in reality, overloading your setup can cause fatigue and shaky footage, even if the rig is sturdy. Instead, focus on lightweight components crafted from materials like carbon fiber, which can significantly reduce your rig’s weight without sacrificing strength, making lengthy shoots more manageable. Additionally, newcomers often believe that stacking accessories arbitrarily enhances functionality, but improper placement can shift the rig’s balance, increasing strain and reducing control. Proper ergonomic arrangement, such as balanced monitor and handle positioning, is critical for smooth operation. A common mistake involves neglecting cable management; tangled wires not only create safety hazards but also disrupt balance, leading to unintended movements. Using dedicated cable clips and strategic routing prevents these issues and preserves rig stability. On a more advanced note, many assume that upgrading to the latest top handle or cage guarantees improved performance. However, compatibility and proper installation matter more; an incompatible or poorly mounted component can cause twisting, rattles, or unwarranted flex, diminishing shot quality. The significance of secure, precise fittings cannot be overstated—an expertly installed cage or handle ensures rigidity and safety. Have you ever fallen into this trap? Let me know in the comments. Recognizing these nuances helps you build a truly professional setup, avoiding common pitfalls and ensuring your gear works seamlessly for top-tier production. For expert tips on optimizing your rig setup, check out our guide on how to enhance your filming experience and make every shot count.
Keeping Your Rig in Peak Condition
Maintaining your camera rig’s performance over time requires more than just proper setup—it involves regular care, precise tools, and strategic upgrades. I personally swear by using a combination of high-quality wrenches, silicone lubricants, and digital calibration tools. For instance, I always carry a set of precision Torx and Allen wrenches, which are essential for tightening and adjusting components without stripping threads. Regularly inspecting and tightening bolts prevents unwanted wobble, which can degrade shot quality. Rig maintenance isn’t just about keeping parts secure; it’s about ensuring consistent results across multiple shoots.
Why Use Specialized Tools for Rig Upkeep?
Generic screwdrivers can damage delicate parts over time, especially with frequent adjustments. Investing in a dedicated toolkit with metric and imperial precision Allen keys, cable testers, and a small set of replacement screws can save you hours of troubleshooting on location. For example, I rely on a microfiber cleaning brush to remove dust and debris from connectors and joints. This proactive approach reduces wear and keeps everything operating smoothly. When parts show signs of corrosion or permanent wear, swapping them out promptly using the correct tools prevents bigger issues, like a cage twist or monitor slippage. To manage cables effectively, I use cable management accessories that facilitate quick replacements and prevent internal fatigue.
Long-Term Benefits of Proper Maintenance
Consistent upkeep not only extends the lifespan of your gear but also maintains the integrity of your footage. A loose top handle or a wobbly monitor mount could seem minor, but over many shoot days, they contribute to fatigue and shaky footage. Regularly checking and recalibrating connection points with digital tools ensures your setup remains rock solid, especially when working with demanding equipment like the latest cinema cameras. As technology advances, integrating smart calibration devices will likely become standard practice, helping filmmakers catch issues before they become problematic. For the most reliable performance, set a quarterly maintenance schedule—think of it as an investment in your shooting stability.
How Do I Maintain My Rig Over Time
Adopting a routine check-up regimen is crucial. Keep a small toolkit with necessary screwdrivers, anti-vibration mounts, and contact cleaner. Incorporate visual inspections into your pre-shoot checklist—look for loose screws, cracks, or cable frays. Using advanced mounting techniques can further stabilize your gear, reducing wear on contact points. Don’t underestimate the power of preventative care; it ensures your gear works flawlessly when it counts. I recommend trying the tip of balancing and re-tightening all connection points after every few shoots—this small step can drastically improve your rig’s longevity and performance. For a comprehensive approach, explore our guide on rig accessories that are designed for durability, ease of maintenance, and quick setup.
As I reflect on my journey with camera rigs, I’ve realized that the most profound lessons often come from those late-night shoots when everything that can go wrong seems to do so. The key to consistent, high-quality footage isn’t just in having the latest gear, but in mastering the intricate art of rig setup and maintenance. This knowledge transforms a tired, shaky day into a smooth, controlled filming experience that yields cinematic results.
How Missteps Turned Into My Biggest Lessons
- Overloading Doesn’t Equal Stability: I used to believe that piling on accessories would enhance my shots, but I learned that excessive weight leads to fatigue and shaky footage. Upgrading to lightweight, durable components made all the difference.
- Balance is More Than a Buzzword: Achieving perfect balance isn’t just about aesthetics; it’s about preventing fatigue and maintaining shot steadiness. I found that small adjustments in counterweights created a huge leap in comfort and quality.
- Cable Management Saves the Day: Tangled wires seemed minor until I experienced a near disaster on set. Proper routing and secure attachments keep your setup safe, tidy, and reliable.
- Routine Maintenance Matters: Regular inspections and the right tools prolong your gear’s lifespan and keep performance at its peak. A little preventative care goes a long way.
- Invest in Quality for Longevity: Cutting corners with cheap components might save money upfront but leads to frustration and equipment failure. Trusted brands and modular upgrades have been my secret weapons.
Where My Essentials Come From
- Thoroughly Designed Rigs: I trust these shoulder rigs for their perfect blend of strength and lightweight design, crucial for long shoots.
- Precise Calibration Tools: Maintaining optimal balance and alignment is effortless with tools detailed in this comprehensive guide.
- Reliable Cable Solutions: The cable management accessories I use prevent accidental pulls and ensure my setup stays in place.
- Well-Constructed Accessories: Upgrading to rugged handles and cages improves durability and handling control.
Push Your Creative Limits Today
Remember, the secret to seamless long days of filming isn’t a mystery—it’s about thoughtful setup, regular care, and constant refinement. Your rig should feel like a natural extension of your body, empowering you to craft stories with confidence and clarity. Don’t wait for the perfect shot to come to you—take the initiative now, experiment, and elevate your filmmaking game.
What’s the biggest challenge you’ve faced with your rig setup? Share your experiences below—I’d love to hear your stories and offer advice.