3 NATO Rail Safety Pins That Prevent Costly 2026 Gear Drops
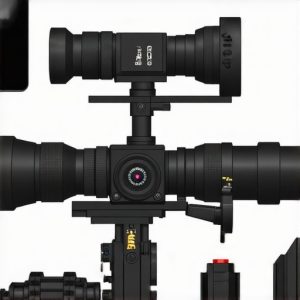
I remember the exact moment I realized how fragile my camera rig could be during a shoot. I had spent hours carefully assembling my setup—top handle, shoulder rig, cages—all to get that perfect shot. Suddenly, a tiny jolt, and I watched in horror as my expensive camera slipped, dangling precariously before I could react. That terrifying experience was a wake-up call: small accessories like NATO rail safety pins could have saved me from a costly disaster.
What Makes NATO Rail Safety Pins a Must-Have in Your 2026 Gear Kit
The truth is, gear drops happen more often than we’d like to admit, especially with the increasing complexity of modern rigs. In the rush of a fast-paced shoot, even a minor vibration can loosen components. I learned this the hard way early on, when I overlooked the importance of securing the NATO rails. A single loose pin nearly resulted in a final shot loss and a hefty repair bill. Since then, I’ve dived deep into solutions that provide peace of mind and keep my gear safe.
That’s where NATO rail safety pins come into play. These simple yet ingenious fixes prevent accidental disconnections, ensuring your rig stays intact during critical moments. With the advent of 2026 tech standards, the importance of reliable security measures like these has skyrocketed — especially considering that, according to a recent industry report, gear drops can lead to damages costing thousands of dollars, impacting both solo creators and professional sets.
Is Overpaying for Extra Security Worth It?
In my early days, I thought investing in extra safety gear was unnecessary—until I faced a near-catastrophe. I made the mistake of ignoring small securing accessories, assuming they were redundant. That costly lesson taught me better. Now, I prioritize durable solutions like NATO rail safety pins, which are surprisingly affordable yet incredibly effective. If you’ve ever wrestled with accidentally loose gear, you know how nerve-wracking it can be. The question is: are you willing to risk a drop that could damage your equipment beyond repair?
For a detailed guide on how these little devices can make a huge difference, check out our comprehensive article on the latest rig innovations that elevate cinematography today. Remember, prevention is always better than repair.
Have You Faced Gear Slip-Ups? Share Your Experience
If you’ve had a close call with gear drops, you’re not alone. Many filmmakers have learned the hard way—either through costly setbacks or stressful moments on set. The good news is, a few simple upgrades, like NATO rail safety pins, can turn your setup into a fortress of security. Don’t wait for a mishap to realize the importance of proactive measures. Ready to secure your rig better? Feel free to reach out through our contact page or explore more tips on stabilizing your camera setup in our top articles. Staying vigilant now means smoother shoots later, and trust me, your equipment (and peace of mind) will thank you.
Attach the Safety Pins to the NATO Rail
Start by locating the NATO rail on your camera cage or quick-release plate. Remove any existing security components if necessary. Take a NATO rail safety pin and align its hole with the corresponding slot on your rail. Push the pin into place until it clicks, securing it firmly. I did this on a recent shoot where I inadvertently bumped my rig; the safety pin held the connection tight, preventing a costly drop.
Ensure Proper Engagement
Once inserted, double-check that the pin fully engages with the rail. Gently tug on the mounted accessories—such as top handles, matte boxes, or follow focus—to confirm they won’t wobble or detach during movement. During my last setup, a quick tug revealed a slightly loose fitting, so I re-adjusted for a tighter fit, which gave me confidence during fast camera movements.
Install Multiple Security Pins for Redundancy
For critical connections, install more than one safety pin at strategic points. For example, securing both the top handle and side handles with safety pins minimizes risk. I learned this the hard way when a single pin failed during a dynamic shot, causing a brief equipment scare. Redundant security ensures peace of mind during demanding shoots, especially with heavier rigs or long days.
Regularly Inspect and Maintain Safety Pins
Incorporate routine checks into your pre-shoot checklist. Confirm the pins are seated correctly and haven’t loosened due to vibration or wear. I make it a habit to visually inspect all NATO connections and give a gentle tug before every shoot. This simple step saved me from a potential disaster on set where a loose pin might have led to gear damage or injury.
Choose Quality and Compatibility
Opt for high-quality safety pins designed for your specific NATO rails. Many budget options may not withstand rigorous use, leading to failures. Additionally, ensure compatibility with your existing camera accessories. For more insights into compatible rig upgrades, visit our top camera cage innovations. Investing in reliable, well-designed safety pins is a smart move to protect your valuable gear during intense filming sessions.
Integrate Safety Pins into Your Routine
Make installing and inspecting NATO rail safety pins a standard part of your setup process. Consistency enhances safety, reduces surprises, and ensures your equipment stays secure under all conditions. When I adapted this routine, I experienced fewer worries on set and more focus on capturing the perfect shot—saving me time, money, and stress during productions.When it comes to building a professional camera rig, many filmmakers fall into traps based on conventional wisdom that isn’t always accurate. A prevalent myth is that adding more accessories automatically results in better footage or increased stability. In reality, overloading your rig can lead to increased weight, reduced mobility, and operator fatigue, ultimately compromising shot quality. According to a study by the Visual Effects Society, overly complex rigs tend to reduce efficiency and increase the risk of technical errors. To avoid this, focus on selecting essential accessories like top handles and shoulder rigs that enhance ergonomics without unnecessary bulk, and always consider the balance and weight distribution. Many assume that using affordable or generic components will suffice, but these can lack durability and precision, causing instability or damage over time. Investing in high-quality, purpose-built components ensures reliability and smoother operation, especially during critical shoots. Moreover, there’s a misconception that all camera cages are universal and interchangeable; however, compatibility issues and slight design differences can cause wobbling or twisting, which may degrade image quality. Regularly inspecting and maintaining your gear, and choosing customizable options, helps sustain optimal performance. For advanced practitioners, understanding the nuances of rig geometry is crucial. Slight adjustments to shoulder mount angles or handle positioning can drastically improve comfort and reduce strain, facilitating longer shoots and sharper footage. Remember, a well-designed rig is less about stacking accessories and more about achieving an efficient, balanced system tailored to your shooting style. Don’t fall for the trap of thinking more is better—it’s about smart choices and precise setup. Want to dive deeper into rig customization? Check out our guide on building your camera rig with the best accessories for stability and control, and avoid costly mistakes. Have you ever fallen into this trap? Let me know in the comments.
Maintaining Your Camera Rig for Long-Term Performance
Proper maintenance of your camera rig is essential to ensure reliable operation and extend its lifespan. Regularly inspecting critical components like the cage, shoulder rig, and top handle can prevent issues before they arise. I personally dedicate time after each shoot to check for loose screws, wear on moving parts, and ensure that safety accessories like NATO rail safety pins remain secure. Using a microfiber cloth to clean contacts and moving parts helps prevent dirt buildup that can cause malfunctions.
Implementing a routine maintenance schedule, including lubrication of joints with precision oil designed for camera gear, can mitigate wear. For example, applying a small amount of synthetic lubricant to the mounting points of your shoulder rig reduces friction and maintains smooth movement. Additionally, safeguarding your equipment during transport with padded cases and protective covers minimizes physical damage. Remember, equipment left unmaintained is more prone to unexpected failures, which can delay shoots and rack up costs.
Essential Tools That Save Time During Setup
Investing in high-quality tools simplifies assembly and troubleshooting. A set of precision screwdrivers with non-marring tips allows me to tighten or loosen small fasteners without damaging the rig’s finish. For quick adjustments on set, I rely on a multi-tool specifically designed for filmmaking gear, featuring adjustable Allen keys, Torx, and flat-head drivers. Having a magnetic parts tray helps keep tiny components organized, preventing loss during setup or breakdown.
One tool I highly recommend is a calibrated torque wrench tailored for camera rig screws. Proper torque application prevents over-tightening, which can deform parts, or under-tightening, risking instability. For example, ensuring that all NATO rail safety pins are secured at the manufacturer-recommended 4Nm torque prolongs their effectiveness and your rig’s integrity.
Adapting to Future Trends with Your Gear
As technology advances, so does the complexity of camera rigs. The trend toward modular systems allows for rapid customization, but also demands more diligent maintenance. Going forward, integrating smart monitoring devices that communicate with your smartphone can alert you to loose connections or impending failures in real time. This innovation is particularly useful when managing heavier, multi-operator rigs, where manual checks may miss subtle issues. Regularly updating your toolkit to include such devices will keep your setup ahead of the curve.
In the future, automation tools—like robotic arms for precise adjustments—may revolutionize maintenance routines, but until then, sticking to proven practices is key. Remember, consistency in maintenance not only conserves the value of your gear but also ensures flawless performance during critical shots.
How do I maintain my rig over time to prevent issues?
Creating a checklist that encompasses cleaning, inspecting, and testing all components after each shoot is invaluable. Repeating this routine, coupled with investing in quality tools like torque wrenches and precision screwdrivers, will reduce unexpected failures. For more detailed advice, explore our guide on anti-twist plate fixes.
If you’d like personalized assistance to optimize your maintenance routine, don’t hesitate to reach out via our contact page. Taking these steps now can save you costly repairs and lost shooting time in the future. Make sure to try the tip of using a calibrated torque wrench for securing your NATO safety pins—it’s a small investment with big returns for your rig’s longevity and safety.
Lessons from the Trenches: What I Wish I Knew About Rig Security
- Secure Every Connection: Early in my career, I underestimated how a tiny loose pin could spell disaster on set. Now I know that even the smallest accessories deserve the same level of attention as your camera itself. Incorporating NATO rail safety pins into my routine has drastically minimized gear slips during critical moments.
- Routine Checks Save Time and Money: Ignoring periodic inspections turned into costly lessons. Weaponizing routine safety pin checks before every shoot ensures peace of mind and keeps delays at bay. Once I started making this a habit, I noticed a significant reduction in post-shoot repairs and stress.
- Redundancy Is Your Best Friend: Relying on a single safety measure is risky. Adding multiple safety pins at key points creates a safety net that keeps your gear intact, even if one pin fails unexpectedly. Learning this the hard way reaffirmed the value of redundancy for professional reliability.
Recommendations for a Future-Proof Rig
Based on my experience, building a resilient camera rig means selecting tools and accessories that adapt with you. Here are some resources I trust:
- Top camera cage innovations: These innovations continuously push the boundaries of stability and compatibility, ensuring your rig remains cutting-edge.
- Best rig accessories for seamless production: Crafting a setup with reliable components maximizes efficiency and minimizes unforeseen issues.
- Essential shoulder rigs for professionals: Comfort and balance are vital for long shoots, and quality shoulder rigs are foundational to that experience.
- Optimizing your camera rig tips: Expert insights help refine your setup, making every shot more stable and confident.
Seize the Moment and Elevate Your Craft
Remember, the journey to perfecting your camera rig never truly ends. Each adjustment, each safety measure, and each lesson learned adds up to more polished, professional footage. Don’t wait for a costly mistake—embrace preventive security now, and watch your confidence grow alongside your skills. Your gear, your audience, and your future projects will thank you for it. Ready to lock in your rig’s security? Share your experiences or questions below—let’s learn together and push the boundaries of cinematography excellence!