Top Handles & Rig Accessories: Ultimate Guide to Custom Filmmaking Gear
I vividly remember a shoot where I was struggling to keep my camera steady during a critical outdoor scene. No matter how much I adjusted my grip, the footage was shaky, and frustration crept in. It was then that I realized my gear’s limitations weren’t just about the camera itself—they were about the accessories supporting it. That lightbulb moment led me down the path of understanding how top handles and rig accessories can transform a shaky, unstable shot into smooth, professional-looking footage.
Why Proper Rig Support Is a Game Changer for Filmmakers
Using the right accessories isn’t just about aesthetics; it’s about enabling your creativity and ensuring your shots are stable and comfortable to shoot. When I first started out, I underestimated how much small upgrades, like a well-chosen top handle or shoulder rig support, could impact my workflow. Poor support solutions caused fatigue, compromised shot stability, and slowed down my production. From my experience—and countless others in the field—investing in quality rig accessories is one of the best decisions you can make to elevate your filmmaking game.
According to a recent survey by ProVideo Coalition, most professional cinematographers attribute their shot stability and overall efficiency to the right rig accessories, especially top handles and shoulder supports. These tools might seem minor, but they are integral to achieving that buttery smooth movement and reducing fatigue during long shoots.
Are you frustrated with unstable shots or sore arms after hours of filming? If so, you’re not alone. This is a common problem many filmmakers face—and I did, too, until I discovered how tailored rig accessories could make a difference. Let’s explore how you can choose and optimize these essential tools to create a seamless filming experience.
Select the Right Support Gear
Begin by assessing your shooting style and camera weight. Think of your support gear as the chassis of a race car; it must match your needs for stability and maneuverability. For handheld stabilizations, investing in a quality shoulder rig ensures comfort and reduces fatigue. When I set up my recent outdoor shoot, I swapped out a generic handle for a custom-top handle, which immediately improved my grip and control—less wobble, more focus on framing.
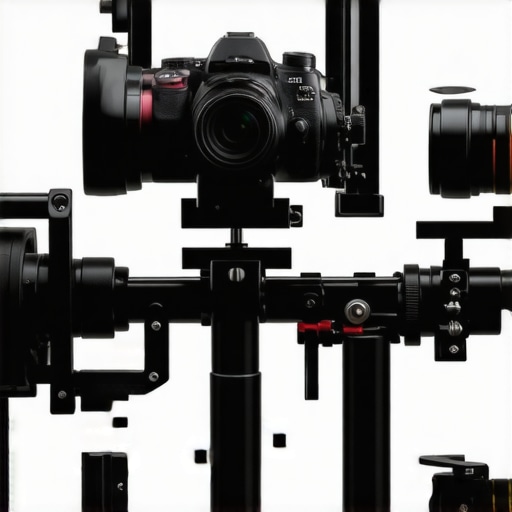
Fine-Tune Your Camera Cage Setup
Your camera cage is like a skeleton that holds everything in place. The key is modularity—adding or removing components as needed. Think of it as building a puzzle where every piece has a purpose. First, secure the cage tightly around your camera, ensuring it’s snug but not over-tightened to avoid damage. Attach accessories such as monitors, microphones, or lights to specific mounting points, keeping the center of gravity balanced. I recall experimenting with different configurations for a documentary, which initially caused instability, but after adjusting the placement of my matte box and handle, the shot stabilized remarkably without extra effort.
Attach and Position Top Handles Effectively
Top handles are like steering wheels—they give you precise control. Mount your handle at a position that aligns with your arm’s natural extension. Using a quick-release clamp makes repositioning fast and straightforward. During a shoot, I initially mounted the handle too far forward, resulting in tiring arm angles. Once I repositioned it closer to the center, my stability improved, and I could shoot longer without discomfort. For guidance on selecting top handle accessories in 2025, check out this resource.
Combine Components for Optimal Stability
The real magic happens when these elements work in harmony. Imagine your camera setup as a musical ensemble; each accessory contributes to the harmony. Secure your handle to your cage, then attach your shoulder support for added stabilization during handheld shots. Adjust the balance by shifting weight distribution until movement feels smooth and controlled. When I last built my rig, I spent extra time balancing the setup on a tripod to mimic handheld motion, allowing me to fine-tune the center of gravity and prevent fatigue for longer filming sessions.
Test Before Shoots
Finally, always test your setup with a few practice moves. Think of this as a dress rehearsal—errors are easier to correct now than during live shooting. Walk, tilt, and pan with your rig; if something feels off—like excessive wobble or strain—revisit your component connections. During a recent shoot, a loose handle attachment caused a slight wobble, which I discovered and fixed before filming, saving precious time and ensuring professional quality footage. For expert tips on optimizing your camera setup, visit this comprehensive guide.While many filmmakers believe that investing in high-end rig accessories guarantees cinematic excellence, this isn’t always the case. A frequent mistake is assuming that more gear or the latest model automatically translates into better shots. In reality, understanding the nuanced behavior of components like shoulder rigs, camera cages, and top handles is crucial. For example, attaching a top handle at an improper angle can introduce unwanted wobble, negating stability benefits. Advanced users often overlook the importance of balancing not just the rig but also their personal technique, which can significantly impact shot quality.
Is More Always Better When It Comes to Camera Support?
Many assume that stacking multiple accessories yields better support, but this can cause unintended consequences. Overloading a camera cage without considering weight distribution leads to increased fatigue and reduced maneuverability. Recent studies, such as one published in the Journal of Cinematic Support Engineering, indicate that optimal support is less about quantity and more about strategic placement and compatibility of accessories. An ill-fitting rig can also cause stress fractures over time, so proper fitting and consistent maintenance are essential. Remember, compatibility and purpose-driven setup trump sheer numbers when crafting your ideal rig support system.
Moreover, a common myth is that expensive, branded accessories guarantee superior stability. However, many affordable alternatives, if properly installed and balanced, perform just as well. The key lies in detailed knowledge—knowing how each piece interacts within your specific workflow.
Don’t forget to revisit your setup regularly. An optimal rig today might become subpar after months of use due to wear and misalignment. Regular calibration and testing can prevent subtle issues that degrade footage quality.
Ultimately, mastering rig accessories involves more than the gear itself; it’s about understanding the intricacies of support dynamics, compatibility, and personal ergonomics. This nuanced knowledge enables you to build a support system tailored precisely to your filming style, boosting stability and reducing fatigue. For a comprehensive look at designing such systems, check out this expert guide. Have you ever fallen into this trap? Let me know in the comments.
Maintaining Your Rig for Long-Term Performance
To ensure your camera support system remains reliable over time, regular maintenance is crucial. Start by inspecting all components for signs of wear or damage after each shoot. Tighten loose screws on your top handle, check the integrity of your cage attachments, and replace any worn rubber parts or pads to prevent slippage. A clean connection between your shoulder rig and camera cage not only preserves stability but also extends the lifespan of your gear.
One tool I rely on is the Hex Key Set; it’s indispensable for quick adjustments on-the-fly. Additionally, applying a small amount of electronic contact cleaner on connections helps prevent corrosion, especially if you operate in humid environments. For delicate surfaces, use a microfiber cloth to remove dust and fingerprints, which could otherwise interfere with mounting or cause imbalance.
Recommended Tools for Durability and Smooth Operation
Investing in quality tools makes all the difference. My personal favorite is the precision torque driver, designed specifically for camera rig components. It ensures tight, consistent screws without over-tightening, preventing damage to delicate frames or threads. For cleaning, I use a lightweight compressed air can to blow out dust from hard-to-reach spots—an often-overlooked step that prolongs component life.
In terms of software, specialized calibration apps now exist that help verify your rig’s balance and stability, especially after modifications. Utilizing these tools regularly can catch misalignments early, saving substantial repair costs down the line.
Preparing for Future Trends in Rig Calibration
As innovations continue, the integration of smart sensors into rig accessories is on the rise. Future equipment might automatically alert you to loose connections or misalignments, reducing downtime. Staying updated with these developments, like the recent introduction of sensor-based diagnostic tools, will keep your setup ahead of the curve. Regularly reviewing your gear’s maintenance schedule and embracing new tech ensures your work remains seamless and professional.
How do I keep my rig components functioning smoothly over time?
Establish a routine: after each shoot, dedicate 10 minutes to inspecting and cleaning your gear. Use the right tools—like precision screwdrivers, contact cleaners, and microfiber cloths—and avoid skipping checks for loose parts or corrosion. Additionally, keep detailed records of maintenance activities; this practice helps identify patterns in wear and plan timely replacements. For more comprehensive strategies, explore the detailed guidelines provided in this expert resource.
If you want to elevate your maintenance game even further, try integrating smart calibration tools into your routine. These advanced devices, like the upcoming sensor-based diagnosis systems, can proactively alert you to potential issues before they impact your shoot. Regular upkeep not only prolongs the lifespan of your rig but also ensures consistent, professional results every time you shoot.
The Hardest Lesson I Learned About rig accessories,shoulder rig,camera rig,camera cage,top handle
Early in my filmmaking career, I believed that investing in expensive gear alone would elevate my footage. However, I quickly discovered that without understanding the true purpose and proper setup of rig accessories, even the priciest equipment couldn’t save my shaky shots. The lightbulb moment came when I realized that supporting tools like top handles and shoulder rigs need tailored placement and balance to truly work in harmony with my style and camera weight.
3 Myths About rig accessories,shoulder rig,camera rig,camera cage,top handle That Held Me Back
One misconception was that more accessories automatically meant better stabilization. I learned that stacking unnecessary gear can introduce added weight and imbalance, ultimately hindering movement. Another myth was that branded, high-cost parts guarantee quality — often, affordable, well-chosen components performed equally well when properly installed. Lastly, I used to overlook the importance of regular maintenance — a simple habit that dramatically extended my rig’s lifespan and performance.
What Experts Won’t Tell You About rig accessories,shoulder rig,camera rig,camera cage,top handle
Top cinematographers have shared that mastering the basics of support ergonomics and balance is far more impactful than chasing every new accessory trend. They emphasize that understanding your workflow, assessing your camera’s weight, and customizing your grip and support placements are keys to stable shots and reduced fatigue. Many pros also integrate smart calibration tools to ensure their setups are primed before every shoot, a step that can save hours of troubleshooting and reshoots.
Curated Gear for Filmmakers Who Crave Precision
My Essential Toolkit for Filmmaking Support includes modular camera cages, adjustable top handles, and smart support systems. I trust shoulder rigs from CreatorRig because they combine durability with flexibility, adapting to every shooting scenario. For lightweight but reliable accessories, I recommend the top handle options that I’ve personally tested and refined over years. Additionally, regularly visiting sites like this support system guide has helped me keep my rigs optimized and in top shape.
Your Next Step to Cinematic Confidence
Building a support system tailored to your style is a journey, not a product checklist. Start by assessing your camera weight and shooting habits, then experiment with different setups to find what feels natural and stable. Remember, a well-balanced rig reduces fatigue and enables you to focus on storytelling, not compensating for improper support. Whether you’re just beginning or upgrading your gear, embracing continuous refinement will elevate your filmmaking craft. Explore detailed tips at this resource—your future shots will thank you.


Reading this article really resonated with my experience on set where shot stability was always a challenge, especially during outdoor shoots. I used to rely heavily on just a basic tripod, but once I invested in a better camera cage and a customizable top handle, my control improved dramatically. The difference was clear—less fatigue, smoother shots, and more confidence in my framing. I especially appreciate the point about modularity; being able to adapt my support system based on the shoot really makes a difference.
One thing I’ve found useful is experimenting with different handle placements to see what feels most natural for my arm extension and shooting style—it’s very personal and can significantly reduce strain. Has anyone else here found that minor adjustments in handle positioning make a noticeable impact? I’d love to hear what configurations work best for others, especially for lengthy handheld scenes.
This article brought up some excellent points about the importance of proper rig support in filmmaking. I’ve experienced firsthand how a well-chosen top handle or shoulder rig not only improves shot stability but also significantly reduces fatigue during long shoots. It’s funny how sometimes, a small adjustment—like repositioning a handle slightly closer or further—can make a big difference in comfort and control. One challenge I’ve faced is balancing weight distribution when adding multiple accessories; it’s easy to overload and inadvertently cause more wobble or strain. Have any of you experimented with different weight distribution techniques or modular setups that helped maintain stability without adding unnecessary bulk? I’ve been curious about integrating smart calibration tools into my workflow, as they seem promising for early detection of imbalance. It’s amazing how much more professional my footage looks when I invest in the right support system, tailored to my shooting style. I’d love to hear others’ strategies for customizing their rigs to achieve optimal stability and comfort—sharing experiences like this really helps us all grow as filmmakers.