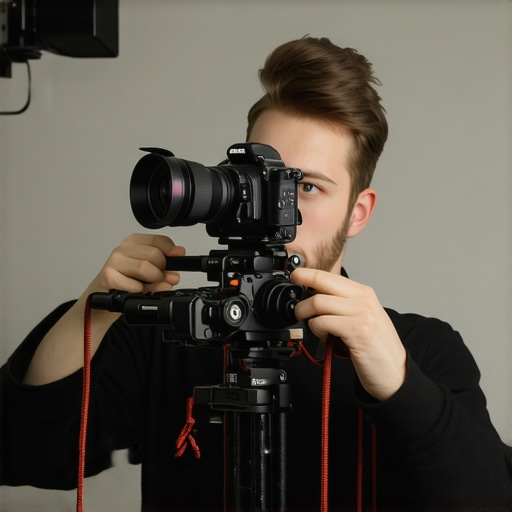
Ultimate Guide to Building Your Camera Rigs with Shoulder Supports
It was a frantic morning on set, and I was trying to get that perfect shot. I reached for my camera, only to stumble and nearly drop it because my rig wasn’t balanced right. That uncomfortable wobble, the fatigue creeping into my arms, and that nagging feeling that I was on the verge of ruining the scene—I’ve been there. That was my lightbulb moment: I needed a better way to support my camera without sacrificing stability or comfort.
Why Building the Right Camera Rig So Matters
If you’re anything like me, you crave smooth, professional-looking footage but often find yourself battling the weight and awkwardness of your equipment. The truth is, a poorly assembled rig can sabotage your shot and drain your energy faster than you can say “action.” Developing a well-thought-out setup isn’t just a matter of attaching parts haphazardly; it’s about creating a system that balances ergonomics, stability, and versatility.
By understanding the nuances of shoulder supports, top handles, and cages, you can dramatically improve your filmmaking experience. And trust me—once I refined my rig, my shots became steadier, and my workflow much less exhausting.
Have you ever struggled with shaky footage or felt your arms give out during long shoots? If so, you’re not alone. The good news is, with some expert tips and the right accessories, you can build a setup that makes shooting less like a workout and more like pure creative expression. It’s all about choosing the right components and knowing how to assemble them effectively.
To get started, let’s look at common pitfalls and how to avoid them, setting the stage for a rig that works *for* you, not against you.
Skeptical? Is a Custom Rig Really Worth the Effort?
One mistake I made early on was believing that a generic, off-the-shelf rig would do the job. Spoiler: it didn’t. It lacked flexibility and ended up causing more strain than support. Trust me, investing time in customizing your rig pays off—your shots will be smoother, and you’ll enjoy the process more. Learn how proper support systems transform filmmaking.
In the next sections, I’ll guide you through the essential components and setup tips to ensure your camera rig becomes an extension of your creativity instead of a burden. Ready to take your filmmaking to the next level? Let’s dive in.
.
Choosing the Right Components
Start by selecting a sturdy camera cage compatible with your gear; it provides a solid foundation and attachment points for accessories. Personally, I once attached a lightweight cage to my DSLR, which I initially thought would be sufficient, but it wobbled during handheld shots. Upgrading to a heavier-duty cage with multiple mounting points eliminated that issue and improved stability. For detailed options, check out this guide.
Integrate a Top Handle for Versatility
Next, attach a top handle to facilitate comfortable handheld operation and quick maneuvering. When I first added a top handle, I found it significantly reduced arm fatigue during extended shoots. Secure the handle firmly to the cage’s mounting points, ensuring it doesn’t shift or wobble. Experiment with different handle positions to find what allows for smooth pan and tilt movements. For innovation inspirations, visit this resource.
Optimize Shoulder Support
Balance is crucial, so incorporate a shoulder rig or support pad. I once used a makeshift cushion on my shoulder; it looked unprofessional and was uncomfortable. Replacing it with an adjustable shoulder pad and counterweights made a noticeable difference, stabilizing my footage and reducing fatigue. Adjust the weight distribution so the rig sits snugly without putting strain on your neck or back. Check this article for the best shoulder support options.
Fine-Tune Your Balance
After assembling your components, fine-tune the balance by adjusting the position of each accessory. I recall a time I spent an excessive amount of time balancing my rig on a windy day; shifting the battery and monitor slightly forward made my camera more stable. Use adjustable screws and mounting points to distribute weight evenly—this prevents unwieldy handling and shaky footage. Remember, the goal is to achieve a natural, comfortable stance that supports your shot style.
Secure and Test Before Shooting
Finally, double-check all fasteners and connections to prevent accidental slips during filming. I once skipped this step and lost a microphone mount mid-shot—resulting in filming delays. Always test your rig with a few practice shots to identify any imbalance or loosened parts. This proactive step saves time and ensures your setup performs reliably in dynamic shooting environments.
Many enthusiasts believe that assembling a camera rig is simply about stacking accessories for support and stability. However, the truth is, there’s a nuanced layer that even experienced filmmakers often miss, which can severely impact shot quality and comfort. Contrary to common belief, more equipment doesn’t always mean better results; instead, the key lies in understanding how each component interacts under actual shooting conditions.
A frequent mistake is overemphasizing flashy accessories like high-end top handles or elaborate cages without considering their ergonomic integration. For instance, adding too many quick-release plates or incompatible mounting points can introduce imbalance, making handheld shots shaky or exhausting to maintain. This oversight stems from assuming that more features equate to enhanced stability, but it often results in the opposite—introducing unintended movement and fatigue.
Another overlooked aspect involves the synergy between shoulder supports and rig weight distribution. Many filmmakers fail to fine-tune their shoulder rigs, neglecting small adjustments that could alleviate strain. For example, misaligned counterweights or an improper angle of the shoulder pad can cause neck strain and reduce shot steadiness. Remember, the goal isn’t just weight reduction but achieving an equilibrium that allows for fluid movement with minimal fatigue.
A common myth is that all camera cages are created equal. In reality, the versatility of a cage lies in its attachment points and modularity. A well-designed cage should provide multiple mounting options, enabling you to customize your rig based on specific shot requirements. This adaptability is critical in complex setups where integrating monitors, microphones, and lighting fixtures can otherwise become cumbersome.
From an advanced perspective, understanding the interaction between rig accessories and vibration dampening is crucial. Incorporating gimbal mounts or shock-absorbing brackets can significantly reduce micro-vibrations that compromise footage quality, especially during dynamic shots. Neglecting these subtle details can lead to footage that appears shaky even with a sturdy rig.
Have you ever fallen into this trap of oversimplification or overlooked these intricacies? Let me know in the comments. For a comprehensive guide on optimizing your setup, I recommend exploring this resource. Remember, mastering the nuances of your gear elevates your filmmaking from average to professional.
Keeping It Working: Essential Maintenance and Tools
To ensure your camera rig remains reliable and performs at its best over time, regular maintenance and using the right tools are non-negotiable. I personally swear by a toolkit that encompasses precision screwdrivers, lubricant sprays, and cleaning supplies tailored for delicate camera components. A high-quality interchangeable screwdriver set allows me to tighten or replace mounting screws swiftly, preventing wear and tear from causing instability.
For cleaning, I use a microfiber cloth combined with a compressed air blower to remove dust from sensitive parts like the cage’s mounting points or the top handle. This simple ritual helps prevent dust buildup that can interfere with proper function or cause scratches. Additionally, applying a small amount of silicone-based lubricant to moving joints—like adjustable shoulder pads or quick-release mechanisms—keeps everything operating smoothly and reduces the risk of seized parts after months of use.
Investing in a dedicated carry case not only protects your rig during transit but encourages routine inspections. Before each shoot, I quickly inspect all fasteners and mounting points; if I notice any loosened screws, I tighten them immediately. This habit prevents accidents, like dropped accessories or unstable shots, which can be costly or damaging.
Looking ahead, as camera technology evolves and rigs become even more complex, specialized tools such as torque wrenches for precise tightening and anti-static brushes for electronic components will become invaluable. Furthermore, integrating software-based maintenance schedules or even app alerts for component lifespan can help track your gear’s health more effectively.
How do I maintain my camera rig over time?
Consistent maintenance extends your rig’s lifespan and ensures consistent shot quality. Schedule routine checks—monthly if you shoot frequently—and document any wear or repairs. Following this disciplined approach minimizes unexpected breakdowns and keeps your setup ready for action at a moment’s notice. For detailed guidance on preventive care, visit this resource.
One advanced tip I recommend trying is applying a small amount of silicone lubricant to your rig’s adjustable joints. This simple step can significantly extend the smoothness of your movements, especially during long shoots or when frequently switching configurations. Remember, the more proactive you are with maintenance, the longer your equipment will serve you—and the better your footage will look.
Looking to upgrade your support system? Check out this comprehensive guide for expert strategies on maintaining and enhancing your camera setup for long-term success.
Over the years, my journey in crafting the perfect camera rig has taught me that success isn’t just about adding more gear—it’s about making smarter choices that enhance stability, comfort, and creativity. From battling shaky footage to designing rigs that feel like an extension of your body, every lesson brought me closer to mastering this craft. Remember, the best rigs are those tailored to your shooting style, not just the latest gadgets.
What I Wish I Knew Before Customizing My Camera Support System
- Choosing the right support components early on saved me hours of frustration. Investing in a modular cage and versatile top handle gave me the freedom to adapt quickly on set. Trust the process of trial and error—sometimes, the simplest adjustments yield the most professional results.
- Paying attention to balance isn’t just about weight; it’s about how each part interacts during your shot. Fixing a minor misalignment made my footage dramatically steadier and my shoots less exhausting. Learning to fine-tune your setup can elevate your filmmaking significantly.
- Maintenance is the unsung hero of reliable gear. Regularly inspecting and cleaning my rig extended its lifespan and kept my shots smooth. Even a quick check before each shoot prevents costly setbacks and keeps your creative momentum going.
Tools and Resources That Changed My Approach
- Dedicated torque wrench—I use this for precise tightening, ensuring every screw stays put during intense shoots. It’s a small investment that pays for itself in peace of mind.
- Microfiber cleaning kits—Keeping my camera cage and accessories dust-free maintained optimal performance and avoided scratches. It’s a simple habit that preserves your gear’s integrity.
- Support system guides—I highly recommend diving into detailed resources like this comprehensive guide. They offer actionable advice to refine your setup tailored to your specific needs.
- Quality carrying case—Protects your investment and prompts regular inspection routines, saving time and money in the long run.
Embrace the Art of Rig Mastery
Your camera rig is more than just a collection of parts; it’s a vital tool that can transform your filmmaking experience. Whether you’re shooting a quick documentary or a cinematic masterpiece, investing in proper support and maintenance elevates your work. The key is to stay curious, experiment patiently, and learn from each shoot. The horizon of professional filmmaking is within your reach—start building the support system that propels you forward.
What’s the biggest challenge you’ve faced when setting up your camera support? Share your story below—let’s learn together and elevate our filmmaking game.


![How to Balance a 20lb Shoulder Rig Without Back Pain [2026]](https://rigs.creatorrigreviews.com/wp-content/uploads/2026/03/How-to-Balance-a-20lb-Shoulder-Rig-Without-Back-Pain-2026-300x300.jpeg)