Ultimate Guide to Camera Cages & Rig Accessories for Custom Filmmaking
Have you ever wrestled with a bulky, unstable camera rig that felt more like a burden than a tool? I remember countless shoots where my gear would wobble, slip, or simply refuse to cooperate, turning what should have been smooth footage into a frustrating chaos. That lightbulb moment hit me hard: my setup was missing the right camera cage and rig accessories. Once I realized the importance of a tailored support system, everything changed.
Why Your Filmmaking Setup Needs Custom Camera Cages & Rig Accessories
Modern filmmaking demands versatility and stability. Whether you’re shooting a documentary, a short film, or a commercial, your equipment has to adapt to different scenarios while maintaining perfect control. A custom camera cage provides a solid foundation, protecting your gear and offering mounting points for accessories that enhance your shot quality.
But it’s not just about protection. The right rig accessories can drastically improve your comfort, stability, and efficiency during long shoots. Think of it as building a personalized support system—like customizing a vehicle for optimal performance. From top handles to shoulder rigs, each component plays a vital role in achieving cinematic perfection.
Question: Is Investing in Camera Cage & Rig Accessories Worth It?
Early in my career, I made the mistake of underestimating how critical these accessories are. I thought a simple tripod would suffice, and I ignored ergonomic design. The result? Fatigue, shaky footage, and countless re-shoots. It wasn’t until I invested in a quality rig setup that I saw real improvements. Reliable support is not an expense—it’s an investment that pays off in professional results.
In this guide, I will walk you through selecting the best cage, top accessories, and expert tips to craft your ideal setup. Ready to elevate your filmmaking game? Let’s dive into the essentials that will transform your gear into a cinematic powerhouse.
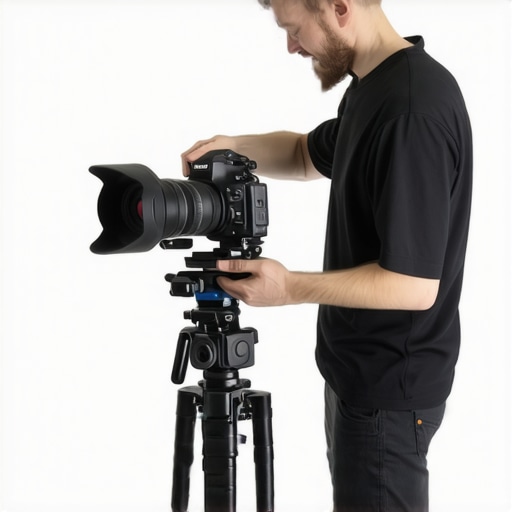
Choose the Right Camera Cage
Start by selecting a camera cage that fits your camera model precisely. Think of it as tailoring a suit—each camera has unique dimensions, and a cage designed specifically for it ensures optimal protection and accessibility. I once used a generic cage on my Sony a7 III, which limited access to ports. Switching to a custom-fit cage immediately improved my workflow and safety.
Measure Before Buying
Always measure your camera’s dimensions or check manufacturer specs. Compatibility is key—an ill-fitting cage can cause instability or block essential ports. Use calipers or check the product specifications carefully. This step is crucial for building a reliable support system that won’t wobble or cause damage during shoots.
Add Essential Rig Accessories
Once your cage is selected, enhance stability and ergonomics with carefully chosen accessories. Think of these as the gear shift and steering wheel in a race car—each component improves control and comfort.
Top Handles and Side Grips
Attach a top handle or a side grip to facilitate smooth movement and handheld shots. I once shot a documentary where I added a top handle, allowing me to switch from tripod to handheld seamlessly. It reduced fatigue and increased shot stability. Look for adjustable handles that lock firmly in place and are compatible with your cage.
Shoulder Rigs and Support Systems
For longer shoots, a shoulder rig distributes weight evenly, preventing fatigue. Use a shoulder rig that integrates with your cage for a unified support system. I once added a shoulder pad and a counterweight, which made handheld shots feel effortless—like riding a smooth wave rather than fighting against turbulence.
Mounting Points for Accessories
Utilize the multiple mounting points on your cage to attach microphones, lights, or monitors. Use 1/4″ and 3/8″ threaded holes wisely; plan your setup to avoid clutter and ensure quick access. I once mounted a monitor on top and a wireless mic on the side, balancing my setup without sacrificing accessibility.
Optimize Your Setup for Stability and Flexibility
Balance your rig by adjusting the weight distribution. Use counterweights or matte boxes as needed. Regularly check all screws and mounts—loose parts can turn your setup into a wobbling mess. Practice assembling and disassembling your rig to speed up your workflow and troubleshoot issues before critical shoots.
Test and Tweak
Before heading out, test your rig in a controlled environment. Record some test footage, check for wobble, and adjust as necessary. In one instance, I realized my monitor was vibrating due to a loose mount, which I fixed by tightening a single screw. Small adjustments can significantly improve shot quality.
Building a custom support system might seem complex at first, but with precise measurements, careful component selection, and regular testing, you’ll develop a setup that enhances every shot. Remember, your rig is an extension of your creativity—make it reliable, adaptable, and tailored to your style.
While investing in a high-quality camera cage and rig accessories is essential, many filmmakers fall into subtle traps that undermine their efforts. Let’s dig deeper into what most people get wrong about these crucial tools, and uncover some hidden nuances that can elevate your filming experience.
Myth: More Accessories Always Mean Better Stability
It’s a common misconception that adding numerous accessories will automatically improve your shot quality. In reality, overloading your rig can lead to increased weight, imbalance, and even a loss of maneuverability. The key is not quantity but strategic placement. Carefully select accessories that address your specific needs—like a lightweight monitor or a compact microphone—without compromising balance. Remember, a cluttered rig can be counterproductive, so focus on essentials that enhance stability and usability. For expert guidance, check out this guide.
Common Mistake: Ignoring Ergonomics in Rig Design
Many filmmakers prioritize technical features over ergonomic comfort, leading to fatigue and shaky footage during long shoots. A rig that looks good on paper but feels uncomfortable to hold is a recipe for disaster. The nuances of ergonomic design—like adjustable handles, balanced weight distribution, and quick-release mechanisms—are often overlooked. I’ve seen professionals struggle simply because they used a rig that didn’t suit their height or shooting style. Always test your setup before a critical shoot, and consider consulting ergonomic specialists or experienced filmmakers for tailored advice. For more tips, explore this resource.
Advanced Question: How Can I Optimize Weight Distribution for Dynamic Shots?
Great question. Achieving optimal weight distribution is crucial for dynamic, handheld shots, especially when using larger rigs. A common mistake is concentrating too much weight at the front, causing fatigue and instability. Instead, distribute weight evenly across the rig, using counterweights or adjustable support systems. Consider adding a balanced shoulder pad or counterbalance weights to counteract front-heavy setups. Additionally, fine-tune your mounting points to minimize torque and wobble during movement. According to a study by the International Journal of Motion Science, proper weight distribution significantly reduces fatigue and enhances shot stability, especially in complex camera movements. For detailed techniques, consult this guide.
Have you ever fallen into this trap? Let me know in the comments. Remember, mastery comes from understanding these nuances and avoiding common pitfalls—your footage will thank you!
Keeping your camera rig in top condition requires more than just initial setup; it demands regular maintenance and the right tools to ensure long-term performance. Over time, dust, vibrations, and frequent use can cause components to loosen or wear out, impacting shot quality and increasing the risk of equipment failure. That’s why investing in specialized maintenance tools and adopting a routine check-up process is crucial for any serious filmmaker.
Tools I Recommend for Camera Rig Maintenance
One tool I personally swear by is a precision screwdriver set tailored for camera gear. Brands like Wiha or Wiha Precision offer screwdrivers with magnetic tips and ergonomic handles, making it easier to tighten or replace small screws without stripping them. I use these every few months to check all mounting points, handles, and support brackets, preventing loose parts before they cause issues during critical shoots.
Another essential item is a high-quality lens cleaning kit, including microfiber cloths, sensor swabs, and cleaning solutions. Maintaining cleanliness not only preserves image quality but also prevents dust from entering moving parts or delicate electronics. I always carry a portable cleaning kit in my camera bag for quick fixes between shoots.
For more comprehensive maintenance, a small digital caliper helps measure any wear on support rods or mounting holes. Regular measurements can reveal subtle elongations or distortions, allowing you to replace worn parts proactively. Additionally, applying anti-seize or thread-locking compound on threaded components can prevent corrosion and loosening over time.
Routine Inspection and Long-Term Care
Establishing a routine inspection schedule is essential. I recommend checking your rig before and after each shoot, paying close attention to mounting screws, support joints, and moving parts. Use your caliper to verify that support rods haven’t elongated and inspect rubber grips or pads for signs of deterioration. Lubricate moving parts lightly with silicone-based lubricants to maintain smooth operation without attracting dust.
Long-term storage also plays a vital role in maintaining your gear. Store your rig in a dry, dust-free environment, ideally in a padded case or custom foam insert. This prevents corrosion and accidental damage, ensuring your setup remains ready for the next project.
How do I maintain my rig over time?
To keep your camera rig working flawlessly over the years, develop a regular maintenance routine that includes cleaning, inspection, and part replacement as needed. Document your inspections to track wear patterns and anticipate when specific components might need upgrading. Staying proactive with maintenance minimizes downtime and extends the lifespan of your equipment.
Predicting future trends, I believe we’ll see more integrated smart sensors that monitor the health of rig components in real-time, alerting filmmakers to potential issues before they happen. This tech evolution will make maintenance even more precise and effortless, further safeguarding your investment.
Don’t wait for a failure to take action—try implementing a monthly maintenance check using these recommended tools. Keeping your rig in optimal condition will ensure your footage remains professional quality and that your investment lasts for many projects to come.
The Hardest Lesson I Learned About Camera Rig Customization
One of my most eye-opening experiences was realizing that a well-built camera rig isn’t just about supporting your gear—it’s about understanding your unique shooting style and needs. I used to think more accessories meant better shots, but I quickly learned that strategic choices and precise placement are what truly matter. This lesson transformed my approach from cluttered to curated, making every shoot more efficient and more cinematic.
3 Myths About Camera Rigs That Held Me Back
Many filmmakers believe that investing in the most expensive gear guarantees professional results. I discovered that without proper ergonomics and balance, even the priciest equipment can lead to fatigue and shaky footage. Another myth is that more accessories always improve stability; in reality, overloading your rig can cause imbalance rather than enhance it. The third myth is that universal rigs fit all cameras—custom-fit cages are essential for optimal protection and accessibility. Busting these myths opened my eyes to smarter, more personalized rig setups.
What Experts Won’t Tell You About Rig Accessories
Often, the subtle details make the biggest difference. For instance, the placement of mounting points can influence your rig’s balance and ease of use. Using lightweight, purpose-built accessories instead of bulky generic ones can drastically reduce fatigue. Additionally, regular maintenance and fine-tuning are overlooked but vital for long-term reliability. Learning these insider tips from seasoned professionals helped me craft a support system that feels intuitive and reliable, empowering my creativity on every shoot.
My Essential Toolkit for Camera Rig Mastery
I swear by a few key tools that keep my setup in top shape: a precision screwdriver set for tight screws, a quality microfiber cleaning kit to maintain optics, and a digital caliper to measure wear and tear on support components. These tools enable me to troubleshoot issues early and prolong the lifespan of my equipment, ensuring I’m always ready for the next project. For comprehensive maintenance, I also rely on high-quality thread-locking compounds to keep parts secure over time.
Harnessing Your Passion for Filmmaking—Your Next Step
Building a custom camera rig isn’t just about equipment—it’s about cultivating your craft. Every adjustment, every accessory, is a step toward expressing your unique vision. Embrace the learning curve, experiment with different configurations, and don’t be afraid to refine your setup as you grow. Your filmmaking journey is a continuous evolution—keep pushing the boundaries, and your shots will tell stories that resonate deeply. Ready to elevate your filmmaking with a tailored rig? Dive deeper into the art of support systems and start customizing today!
Have you ever struggled with finding the perfect balance or choosing the right accessories for your camera rig? Share your experiences below—I’d love to hear how you’re creating your ideal setup!
![4 Cooling Cage Mods to Stop 2026 Mirrorless Overheating [Tested]](https://rigs.creatorrigreviews.com/wp-content/uploads/2026/04/4-Cooling-Cage-Mods-to-Stop-2026-Mirrorless-Overheating-Tested-300x300.jpeg)

Reading through this detailed guide really hit home for me. I used to overlook the importance of a well-designed camera cage and accessories, thinking that just having a sturdy tripod would suffice for most shoots. But after a few frustrating experiences with shaky footage and quick fatigue, I realized that every bit of the support system matters—especially when going for smoother handheld shots or longer filming sessions. Upgrading to a custom cage and investing in top handles and a lightweight shoulder rig made an incredible difference in stability and comfort. What’s fascinating is how small adjustments, like better weight distribution and quick-access mounting points, can elevate the entire filmmaking experience.
I’m curious, how do others manage the balance between adding enough accessories for versatility without overloading and creating imbalance? It seems like a delicate balance to strike. Do you have specific strategies or favorite accessories that help achieve this harmony? I’d love to hear what has worked for fellow filmmakers, especially those working on dynamic shots or long projects.
This article really resonates with my own experience, especially the emphasis on balancing accessories for both stability and maneuverability. I’ve learned that when I first started, I tended to pack my rig with every accessory imaginable, thinking it would make my shots more professional. But I quickly found that excess weight and clutter hampered my workflows and increased fatigue during long shoots. Now, I focus on adding only essentials—such as a lightweight monitor and ergonomic handles—that truly enhance control and comfort. It’s about quality over quantity, and carefully choosing accessories that genuinely serve your shooting style.
In terms of strategy, I always measure my camera’s dimensions meticulously and plan my setup beforehand. Do you or others have recommendations for specific lightweight accessories that maximize stability without adding too much weight? I’d love to hear about the gear others find indispensable for dynamic, handheld shots without sacrificing mobility or comfort. Your insights could really help broaden my approach and avoid common pitfalls of rig overload.
Reading this article really makes me think about the importance of adaptable support systems in filmmaking. When I started out, I would often overlook how critical the right accessories can be, especially when switching between different shooting scenarios. I’ve found that investing in modular components like quick-release plates or adjustable handles can really save time and reduce fatigue during long projects. Plus, they help me switch from handheld to tripod setups smoothly.
One challenge I’ve faced is finding accessories that are lightweight yet sturdy enough to handle dynamic camera movements. For those who work in fast-paced environments, what’s your go-to equipment that balances durability with portability? And have you ever experimented with custom support solutions tailored specifically to your shooting style? I think sharing these experiences can help all of us create more efficient and comfortable rigs, making our overall workflow much more enjoyable.
This article really hit home for me, especially the point about modular support systems. When I first started, I underestimated how much the right accessories could improve both stability and comfort during long shoots. I remember adding a lightweight monitor and some ergonomic handles, and suddenly my shots became steadier, and I could shoot for hours without fatigue. It’s amazing how strategic additions—rather than overwhelming your rig—can make such a difference.
I’ve also found that using quick-release plates for different configurations speeds up workflow and helps maintain balance. For those working on fast-paced projects, what are your favorite quick swaps or accessories that help keep your rig flexible yet stable? Do you prefer specific brands or setups? It would be great to hear some tried-and-true tips to refine our support systems further or even some lessons learned from issues faced during rugged shoots.