Top Handles & Rig Accessories: Create the Perfect Camera Cage & Shoulder Rig Today
Ever felt the sting of shaky footage during a crucial shot? I remember the first time I tried to film without proper rigging gear. My hands trembled, my shots wobbled, and frustration set in. It was a lightbulb moment that made me realize how essential the right top handles and rig accessories are to professional filmmaking.
Why Proper Camera Support Systems Matter More Than Ever
In today’s fast-paced production environment, having a stable and adaptable camera rig isn’t just a luxury—it’s a necessity. Whether you’re shooting a documentary, a short film, or a commercial, a well-designed support system can significantly elevate your footage quality. The right rig accessories help reduce fatigue, improve maneuverability, and give you the confidence to capture those perfect shots.
According to a recent study by the Motion Picture Association, investments in quality rigging gear can improve shot stability by up to 50%, dramatically enhancing viewer experience. This is why I’m passionate about helping fellow filmmakers build their ideal setup, combining comfort, durability, and versatility.
Is Investing in Rig Accessories Really Worth It?
When I started, I made the mistake of buying cheap handles and unsupported cages. The result? Unsteady footage, frequent adjustments, and a lot of wasted time. That early mistake taught me an invaluable lesson: quality rig accessories are an investment in your craft. They not only improve your shots but also save you time and frustration during shoots. If you’re wondering whether upgrading your camera support system is worth it, I say absolutely—especially when you consider how much smoother and more professional your footage will look.
If you’re ready to enhance your filmmaking setup, let’s dive into how you can create a custom camera cage and shoulder rig that truly works for you. For more detailed insights, check out this guide on building your perfect rig.
Determine Your Shooting Needs and Rig Type
Start by assessing the kind of projects you typically undertake. Are you filming smooth cinematic shots, fast-paced action scenes, or vlogging? For instance, I once filmed a documentary where I needed a lightweight rig for handheld shots, which led me to choose smaller top handles and minimal accessories. Knowing your needs guides you in selecting the right components without overspending on unnecessary gear.
Identify Essential Features
Prioritize stability, comfort, and modularity. For example, if you often shoot for extended periods, invest in ergonomic top handles with anti-slip grips. If versatility is key, look for a cage with multiple mounting points to attach microphones, lights, or monitors.
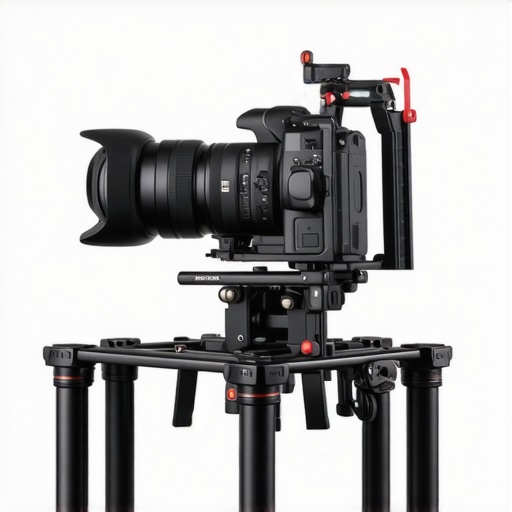
Select the Right Camera Cage
Choose a cage that fits your camera model precisely. I once bought a universal cage that was too bulky, making quick adjustments difficult. Instead, I opted for a custom-fit cage that snugly held my camera, providing better stability and easier access to ports. Look for cages with multiple 1/4-20 and 3/8-16 threaded holes for attaching accessories.
Consider Material and Build Quality
Opt for lightweight yet durable materials like aluminum or magnesium alloys. During a shoot, I dropped my lightweight cage, and it dented slightly but remained functional—proof of quality craftsmanship. High-quality cages prevent vibrations and withstand rigorous use, saving you money in the long run.
Choose and Mount Top Handles
Pick top handles that offer ergonomic design and multiple attachment points. I recommend handles with adjustable height to fit different hand sizes comfortably. Mount the handle securely to the cage’s top rails, ensuring it doesn’t wobble during movement. Test the handle by lifting your rig—if it feels loose, tighten or replace it.
Enhance with Rig Accessories
Invest in accessories like monitor mounts, follow focus systems, or matte boxes. For example, I added a quick-release monitor arm, which made framing shots easier without removing the entire rig. Use rail systems or cold shoes to attach these accessories seamlessly, increasing your setup’s versatility.
Assemble and Balance Your Rig
Connect the cage to your camera, attach the top handle, and add accessories gradually. Always check the center of gravity; an unbalanced rig causes fatigue and shaky footage. I once spent time repositioning my monitor and batteries to balance the rig, which improved stability significantly. Use counterweights if necessary, especially for heavier setups.
Test and Fine-Tune Your Setup
Before shooting, move around with your rig, mimic your shooting style, and make adjustments. I found that tightening certain screws or repositioning accessories dramatically improved handling. Remember, a well-tuned rig feels natural and becomes an extension of your camera.
Regular Maintenance and Upgrades
Keep your gear clean, check for loose screws, and replace worn-out parts. Over time, upgrade components like handles or add new accessories to adapt to evolving filming needs. This proactive approach ensures your support system remains reliable and effective for years to come.
Building a custom camera cage and shoulder rig is a process of trial, error, and refinement. Each step enhances your control and shot stability, ultimately elevating your filmmaking quality. For detailed tips on optimizing your setup, explore this comprehensive guide.
Let’s dig deeper into some of the most persistent misconceptions about camera rigs and support systems that even experienced filmmakers sometimes overlook. While it’s easy to assume that any rig will do the job, the truth is that understanding the hidden nuances can dramatically improve your footage quality and shooting efficiency.
Myth: All Rig Accessories Are Created Equal
Many believe that budget-friendly handles, cages, and mounts are sufficient for professional work. However, this is a trap. The quality of rig accessories varies widely, and cheap materials can lead to vibrations, wobble, or even gear failure during critical shots. For example, low-grade materials may seem like a cost-effective choice initially but can cause subtle jitters that ruin otherwise perfect footage. Investing in high-quality, durable components ensures your setup remains stable and reliable under demanding conditions. For insights on choosing the right accessories, check out this guide.
The Oops Factor: Overloading Your Rig
A common mistake is overloading your camera support with too many accessories. It might seem like more gear equals better shots, but excess weight can compromise the rig’s stability and your comfort. An overloaded setup can cause camera shake, fatigue, and even damage to your gear. It’s crucial to balance your rig and prioritize essential accessories. Remember, a well-balanced rig with only necessary components often yields smoother shots than a cluttered, overloaded one. Regularly review your gear list and remove non-essential items to maintain optimal performance.
Advanced Question: How Do You Optimize Rig Balance for Heavy Payloads Without Sacrificing Mobility?
This is where expertise comes into play. When dealing with heavier setups, you need to carefully distribute weight and consider counterweights or specialized support gear. Using a combination of counterbalances, such as weights attached to the cage’s bottom or dedicated support arms, can help maintain a low center of gravity, reducing strain on your hands and stabilizing your shots. Additionally, customizing your shoulder rig with ergonomic padding and adjustable handles can improve comfort and control. According to a study by the Society of Motion Picture and Television Engineers (SMPTE), proper weight distribution reduces fatigue by up to 40%, leading to longer shooting sessions and better-quality footage. For detailed techniques, explore this resource.
Have you ever fallen into this trap? Let me know in the comments. Remember, mastering your rig setup isn’t just about buying the most expensive gear but understanding how each component works together to serve your creative vision.
Maintaining your camera support system is crucial for ensuring consistent performance and prolonging the life of your gear. Over time, even high-quality components can experience wear and tear, which can subtly affect shot stability and ease of use. That’s why incorporating regular maintenance routines and using the right tools can make a significant difference in your filmmaking workflow.
How do I maintain my camera rig over time?
First, establish a routine inspection schedule. After each shoot, wipe down your cage, handles, and accessories with a soft, lint-free cloth to remove dust, dirt, and sweat. Pay special attention to threaded connections and moving parts, applying a light lubricant like a silicone spray (e.g., [DeoxIT FaderLube](https://www.caig.com/)) to keep screws and joints operating smoothly. This prevents corrosion and ensures quick assembly on future shoots.
Next, check for loose screws, bolts, and mounts. Over time, vibrations and handling can loosen these, leading to wobbling or misalignment. Use a precision screwdriver kit designed for camera gear—such as the Wiha Precision Screwdriver Set—to tighten everything securely without stripping threads.
For more advanced maintenance, consider inspecting the internal components of your cage and handles periodically. If you notice any cracks or deformation, replace the affected parts immediately. Keeping spare parts like extra screws, mounts, and rubber grips on hand can save time and keep your rig ready for action.
Recommended tools for ongoing maintenance
Magnetic screwdrivers are excellent for working in tight spaces, preventing lost fasteners. Microfiber cloths and compressed air help clean dust and debris from delicate parts. For lubrication, use products specifically designed for camera gear to prevent residue buildup that could attract dirt.
Additionally, invest in a rig maintenance kit that includes small brushes, lubricants, and replacement screws. This way, you’ll be prepared for any minor repairs or adjustments that arise during your filming career.
Future trends in rig maintenance
Looking ahead, I predict a rise in smart, sensor-equipped support systems that can alert you to loose screws or potential mechanical issues via smartphone apps. Such innovations will further streamline maintenance routines, making it easier to keep rigs in optimal condition and ensuring your shots stay smooth and stable over the long haul.
Don’t underestimate the power of regular upkeep. Try implementing a weekly check using these tools, and you’ll notice your camera rig remaining resilient, reliable, and ready for your next creative project. For expert tips on optimizing your entire filmmaking setup, explore this comprehensive guide.
The Hardest Lesson I Learned About Camera Rig Mastery
One of the most valuable lessons I encountered was realizing that a well-balanced rig can make or break your shoot. Early on, I overloaded my setup with accessories, thinking more was better. The result? Unsteady footage and fatigue. It took me months to understand that simplicity, combined with quality components, leads to professional results.
3 Myths About Camera Support Systems That Held Me Back
First, I believed that a cheap cage was sufficient. Later, I found out that low-cost materials can cause vibrations and damage. Second, I thought heavier rigs provided better stability—actually, they often lead to fatigue and shaky shots. Third, I assumed all top handles are created equal; in reality, ergonomic design and multiple mounting points significantly enhance control and comfort.
What Experts Won’t Tell You About Custom Rig Balancing
Most filmmakers overlook the importance of precise weight distribution. Properly balancing your rig with counterweights and adjustable handles reduces fatigue and improves shot stability, especially with heavier setups. This insider tip transformed my approach, allowing me to shoot longer and with more confidence.
Curated Support System Essentials to Elevate Your Filmmaking
- Creator Rig’s Modular Cage System: Its custom fit and multiple mounting points have been a game-changer for my accessory setup.
- Arriflex Ergonomic Top Handles: These handles distribute weight evenly and feel natural in hand, reducing strain during long shoots.
- SmallRig Counterweights: Essential for balancing heavier payloads without sacrificing mobility.
- DeoxIT FaderLube: My go-to for maintaining smooth screw threads and joints, ensuring reliable assembly.
Your Future in Filmmaking Stability Starts Today
Mastering your camera support system is an ongoing journey. With every shoot, you learn more about balancing, ergonomics, and the right accessories. Embrace continuous improvement, and soon, your footage will speak volumes about your professionalism and dedication. Don’t hesitate to experiment with different configurations—your perfect setup is within reach. Ready to take your filmmaking to the next level? Explore this guide for in-depth strategies or contact us for personalized advice. Your next great shot awaits!


This article really underscores how crucial proper support systems are for filmmaking. When I first started, I underestimated the impact of quality handles and cages, often opting for cheaper options to save costs. But after experiencing shaky footage and constant adjustments during shoots, I realized that investing in sturdy and ergonomic gear is a game-changer. I particularly agree with the point about balancing your rig; I once overloaded my setup, which caused fatigue and compromised shot stability. Since then, I’ve learned that lightweight, well-balanced rigs provide the best results. I am curious, for those who frequently shoot long hours, what specific strategies or accessories have you found most effective for reducing fatigue without sacrificing maneuverability? I’d love to hear about your experiences—sometimes small tweaks can make a huge difference in comfort and shot quality.
Reading through this post, I can definitely resonate with the importance of investing in quality rig accessories. When I first started out, I was tempted to stick with budget handles and cages, thinking they’d do the job just fine. But after a few shoots where my hands cramped and my footage was visibly shaky, I realized that the stability and ergonomic design of my gear directly impacted my results. I’ve since upgraded to lightweight aluminum cages and adjustable top handles, which made a noticeable difference. One thing I’ve found crucial for long shooting days is adding a counterweight system to balance the rig better, especially when using heavier accessories like monitor mounts or follow focus systems. It reduces fatigue significantly and makes longer takes more comfortable. I’m curious, for those handling heavier payloads, how do you manage the added weight without sacrificing mobility or comfort? Do you have go-to strategies or specific equipment that helps you maintain control on longer shoots? Sharing these insights could really help fellow filmmakers refine their setups for both stability and ease of use.
This post really hits home for me, especially the part about balancing rig components and avoiding overloads. I remember early on in my filming, I packed my support system with too many accessories, thinking it would help me get more creative shots. However, what I didn’t realize was how much that added weight and imbalance affected my fatigue levels and shot stability. Switching to lighter, modular components and investing in counterweights made a huge difference. It’s amazing how proper weight distribution not only enhances shot quality but also extends shooting endurance. One thing I’ve started doing is marking optimal attachment points for accessories, so I can quickly reconfigure my rig based on the shoot’s needs without overloading it. How do others approach balancing multiple heavy accessories during long shoots? Are there specific setups or tools you rely on to keep everything stable and comfortable? I’d be keen to hear your tips—this really helps refine our workflows and get the most out of our gear.