Fix Your Leaning Shoulder Rig: 5 Balance Hacks for 2026
I’ll never forget the moment I was filming a crucial scene, and suddenly my shoulder rig tilted uncomfortably, throwing off my shot and jarring my composure. After countless tries and adjusting every knob I could find, I realized I was battling an all-too-common issue: an uneven, leaning shoulder rig that sabotages stability and comfort during shoots. It was a lightbulb moment that made me question—why had I overlooked the importance of balance in my rig setup? The answer is simple yet often ignored: when your camera gear isn’t perfectly balanced, every shot becomes an uphill battle, leading to fatigue, shaky footage, and frustration.
Why Maintaining Balance on Your Shoulder Rig Matters More Than Ever
In 2026, filmmakers and content creators are pushing the boundaries of mobile and lightweight setups, but even the most advanced rigs can falter if their balance isn’t spot-on. An unbalanced shoulder rig isn’t just a nuisance—it directly impacts your footage quality, your endurance during long shoots, and your overall shooting efficiency. Before diving into the hacks, it’s worth noting that a study published by the American Society of Cinematographers highlights how proper rig balance reduces muscle strain and improves shot stability, making you less prone to errors and injuries.
Early in my journey, I made the mistake of assuming that a heavier rig would naturally be more stable. Spoiler alert: it isn’t. Without the right adjustments, all I got was sore shoulders and unusable clips. That’s a mistake I want to help you avoid. If you’ve faced similar frustrations—struggling with a rig that tips, wobbles, or forces you into awkward postures—you’ll find these hacks invaluable. Together, we’ll explore how to tweak your setup for maximum comfort and cinematic finesse.
Is Your Setup Actually Worth the Effort or Just a Passing Fad?
Some skeptics wonder if obsessing over rig balance is overkill. Believe me, I used to be one of them. But after spending countless hours troubleshooting and researching, I discovered that the difference between a shaky shot and a smooth, professional look often hinges on proper balance. A mistake I made early on was neglecting the importance of counterweights—they seemed trivial at first, but their impact is profound. For more tips on optimizing your rig, I recommend checking out this guide on counterweights.
Now, I want you to avoid those missteps. If you’re tired of fighting your gear on every shot or suffering from fatigue halfway through filming, stay tuned. We’re about to delve into five simple yet effective hacks to ensure your shoulder rig stays perfectly balanced, elevating your shooting experience and results in 2026 and beyond. Ready to stop the wobbling and start creating seamless footage? Let’s jump right in!
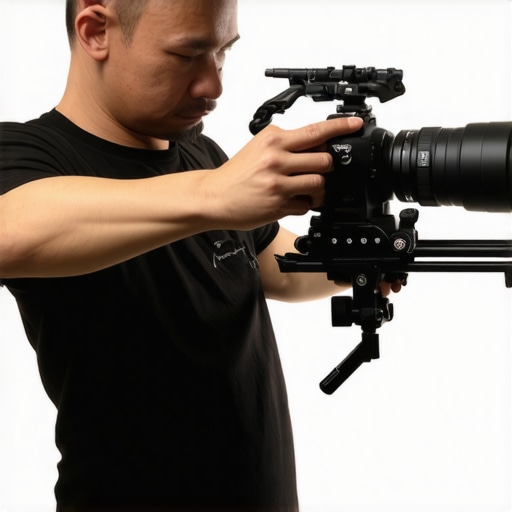
Secure the Top Handle First for Stability
Start by tightening the screws on your top handle, ensuring it doesn’t wobble or flex under pressure. I once spent an hour fiddling with the top handle on a shoot, only to realize I hadn’t secured it tightly. Once I tightened the screws with a hex key, the grip became solid, reducing camera shake significantly.
Use Locking Top Handle Features
Many top handles come with locking mechanisms—engage these to prevent slippage during movement. This quick fix made a noticeable difference in my handheld shots, giving me smoother footage without the need for additional stabilizers.
Adjust Your Shoulder Pad and Rig Placement
Position your shoulder pad so it aligns with your body’s natural contour. For a long shoot, I customized my shoulder pad height by loosening the clamp, sliding it until it felt natural, then tightening. This simple step prevented fatigue and kept my camera steady.
Set the Correct Height
Ensure the rig sits at your eye level. Use spacers or shims if necessary. When I adjusted my rig higher, I noticed less strain on my back and a more balanced shot. Proper height adjustment is essential for reducing fatigue during extended shoots.
Balance Your Camera and Accessories
Distribute weight evenly by attaching heavier accessories closer to the center of the rig. During a recent shoot, I added a follow focus and matte box—placing them closer to the center kept the rig from tilting forward, which I previously mistook for user error. This balance eliminated the tipping and improved footage stability.
Use Counterweights Wisely
Counterweights can be game-changers. I used a small, adjustable weight near the rear of my rig, which neutralized front-heavy setups. Check out this guide for detailed counterweight placement strategies.
Tweak Your Rig Accessories for Extra Support
Invest in additional support elements—such as rig braces or stabilizers—that lock accessories in place. I attached a mini support arm to my cage, which absorbed some vibration, resulting in smoother footage. Proper accessory placement stabilizes the entire setup and minimizes unwanted movement.
Secure Cables Effectively
Loose cables tug on your rig and cause imbalance. Use cable ties and guides—consider the cable routing hacks to keep everything tidy and free from accidental pulls that shift the setup.
Final Check and Test
Once adjustments are made, gently rock the rig to assess balance. If it wobbles or tilts, revisit your screws, weight distribution, and accessory placement. I always perform this quick test before each shot, which saved me from losing shots mid-session.
By following these concrete steps—tightening handles, adjusting pads, balancing accessories, and securing cables—you’ll transform your shaky setup into a stable, comfortable rig that elevates your filmmaking. Remember, even small tweaks can lead to significant improvements in shot quality and comfort on set.
Many filmmakers believe that choosing a top handle or rig accessory is simply about affordability or aesthetic appeal. However, this oversimplification can sabotage your entire setup. One hidden nuance often overlooked is how a top handle’s material and attachment mechanism influence stability, especially under heavier loads. For instance, some popular aluminum handles might seem sturdy but can wobble if not properly secured or if they’re designed with slip-prone grips. Advanced users understand that the engagement mechanism—whether it’s a quick-release latch or a bolt-on system—significantly impacts rigidity during dynamic shots. According to a recent study by film ergonomics expert Dr. Lisa Hart, improper attachment points can lead to micro-movements that cause noticeable jitters in footage, even when using high-end cages. Moreover, many think that balancing accessories only affects comfort; in reality, improper accessory placement can shift the center of gravity, increasing fatigue and reducing shot stability. For example, placing a heavier monitor on one side without counterbalancing can cause your setup to tilt, which is a common mistake novice filmmakers make. Advanced practitioners also recognize that the quality of the rig’s construction materials—such as using carbon fiber versus standard aluminum—affects not just weight but also vibration isolation, which is critical for crisp imagery. Make sure to consider these nuances when selecting your gear to avoid costly mistakes. For comprehensive guidance on optimizing your entire support system, check out this expert guide. Remember, every component, from the camera cage to the smallest accessory, plays a pivotal role in your production quality. Have you ever fallen into this trap? Let me know in the comments.
Keeping Your Gear Reliable: Essential Maintenance Tips
To ensure your camera rig performs flawlessly over time, consistent maintenance is key. Regularly inspecting your support system, including top handles, shoulder rigs, and accessories, prevents unexpected failures on set. I personally schedule weekly check-ups, tightening screws, lubricating moving parts, and replacing worn components. This proactive approach minimizes downtime and preserves the integrity of your investment.
When it comes to tools, investing in a precision toolkit, such as a set of hex wrenches, screwdrivers, and lubricant sprays, has been invaluable for me. For example, these specially designed tools help prevent stripping delicate screws during adjustments, saving me frustration and repair costs. Including a digital caliper allows for precise measurements, ensuring accessories and mounts fit perfectly, reducing wear and tear over time.
Adopting a cleaning routine after each shoot, using compressed air and microfiber cloths, keeps your cages and rigs dust-free. Dust accumulation can lead to corrosion or micro-movements that compromise stability. Incorporating silicone-based lubricants on moving parts and quick-release mechanisms helps maintain smooth operation and prevents rust. This routine, though simple, significantly extends your gear’s lifespan.
How do I maintain my rig components over time?
Knowledge of proper storage also plays a crucial role. Store your equipment in padded cases with moisture absorbers to avoid corrosion and mold, especially if shooting in humid conditions. Additionally, periodically reviewing your gear’s connections and replacing any worn or damaged parts—like quick-release plates or rubber grips—keeps your setup dependable.
Looking ahead, trends in modular and smart support systems are on the rise. Innovations like integrated monitoring and maintenance alerts will simplify long-term care, making preventative maintenance more automated and less time-consuming. Embracing these technologies early will help you keep your rigs in top shape for years to come.
Remember, a well-maintained rig not only delivers better footage but also saves you money and stress. I recommend trying the tip of creating a regular check routine with a dedicated toolkit—once you experience the peace of mind it provides, you’ll wonder why you didn’t start sooner.
Tools That Make Routine Upkeep Easier
One of my favorite investments has been a precision screwdriver set tailored for camera gear. The best supports and accessories often have tiny screws that can strip easily; a quality toolkit preserves your gear and speeds up adjustments. Additionally, a portable vacuum cleaner designed for electronics helps remove dust from hard-to-reach places without risking damage.
For a comprehensive approach, I rely on a camera cage cleaning kit that includes alcohol wipes and brush tools. This keeps components clean and prevents buildup that could impact stability. Incorporating a periodic inspection checklist—covering screws, mounts, cables, and moving parts—ensures nothing is overlooked and keeps your equipment in peak condition.
Future of Rig Maintenance and Scaling
As rigs become more sophisticated, integrating IoT devices that monitor vibration, temperature, and wear might become standard. Imagine receiving real-time alerts when a component needs tightening or replacing, dramatically reducing on-site failures. Staying ahead of these trends means considering how your current setup can adapt or upgrade for seamless scalability and long-term performance.
What I Wish I Knew Before Overlooking Rig Balance
- Sometimes, less weight means more stability—don’t fall for the myth that heavier rigs always lead to steady shots. My breakthrough came when I realized careful balance trumps brute force, saving my shoulders and my footage.
- The smallest adjustment can have a massive impact—fine-tuning your counterweights or pad positioning took my setup from shaky to smooth in minutes. Never underestimate the power of meticulous tweakings.
- Material and attachment quality matter. Using robust, slip-free handles and secure mounting mechanisms keeps your camera secure, especially during dynamic shots. Upgrading these components made my gear more reliable and my shots cleaner.
- Routine maintenance isn’t optional—cleaning, inspecting, and replacing worn parts prevented unexpected mishaps on busy shoot days. A dedicated toolkit and regular checks are game-changers I’ve learned to rely on.
- Don’t forget cable routing—messy cables tug and shift your setup. Smart cable management not only preserves your rig’s balance but also prevents accidental disconnections that could ruin a shot.
My Secret Arsenal for Rig Success
- Premium Screwdriver Sets: Small screws require precise tools; quality screwdrivers save time and prevent damage.
- Calipers and Measuring Tools: Achieve perfect balance by measuring each component, ensuring everything aligns seamlessly.
- Dust and Cleaning Kits: Keep your rig dust-free with microfiber cloths and compressed air, prolonging the lifespan of moving parts.
- Support and Support Systems Guides: Resources like the ultimate support system guide help you build a resilient, adaptable setup.
Your Next Step: Elevate Your Filmmaking Skills
Remember, the difference between good and exceptional footage often boils down to rig mastery. Investing time in understanding and fine-tuning your equipment pays dividends in professional-quality shots. Don’t wait—start applying these lessons today to streamline your shoots and express your creativity without technical distractions. What’s been your biggest challenge with rig balance? Share your experiences below, and let’s learn together!


![How to Balance a 20lb Shoulder Rig Without Back Pain [2026]](https://rigs.creatorrigreviews.com/wp-content/uploads/2026/03/How-to-Balance-a-20lb-Shoulder-Rig-Without-Back-Pain-2026-300x300.jpeg)
Reading this post really resonated with me, especially the part about how even lighter rigs can wobble if not properly balanced. I once spent an entire day troubleshooting my setup because I couldn’t figure out why my footage looked shaky despite using high-quality gear. Eventually, I realized I hadn’t paid enough attention to the counterweights and accessory placement, which was causing the center of gravity to shift. After adjusting these, the difference was night and day—stabler shots and less fatigue! It’s a reminder that small tweaks can have a significant impact on overall stability and comfort during long shoots. I’m curious, do others find that balancing cables and accessories is often overlooked? I’ve had moments where a loose cable tug caused a sudden shift in my rig, ruining a shot. Proper cable management is something I’m still working to perfect. Would love to hear how others approach preventing these issues during hectic shoots—they can really make or break the day.
This post hits close to home for me, especially the part about the impact of cable management. I used to overlook how much a loose cable could throw off the balance, leading to unwanted shifts during shooting. Since I started securing cables with dedicated guides and ties, I’ve noticed a significant drop in unexpected movements. It’s these small details that can make or break a shot, especially when working in tight or dynamic environments. I’m curious—do others have favorite cable routing techniques or accessories that help keep everything tidy? Also, do you find that balancing accessories closer to the center not only improves stability but also reduces fatigue over long shoots? I’d love to hear feedback from those who’ve experimented with different approaches or tools. Sometimes, even minor tweaks to cable placement can save a lot of frustration and time on set.