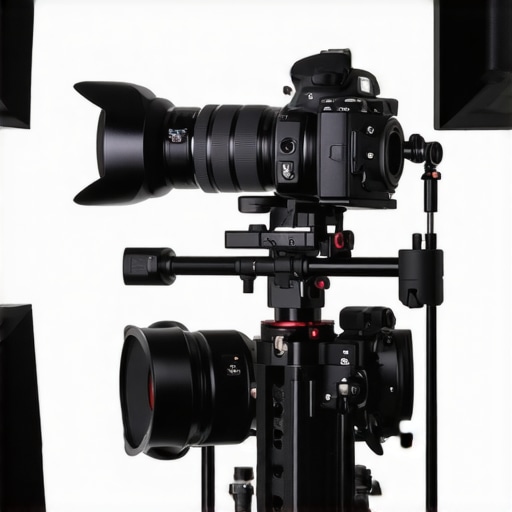
Essential Guide to Building Your Perfect Camera Rig & Cage Setup at 09:23
I remember the first time I tried to shoot a fast-paced scene and my camera rig wobbled like a toddler learning to walk. That sinking feeling of realizing your gear isn’t supporting your vision is pretty common among filmmakers, especially when starting out. It’s like trying to run a marathon in flip-flops—inefficient, frustrating, and bound to cause more harm than good. But here’s the thing: once I finally figured out how to build a reliable, customized camera rig, everything changed. My shots became steadier, my workflow smoother, and my confidence skyrocketed.
Why Your Camera Setup Could Be Holding You Back
Building a camera rig isn’t just about stacking parts together; it’s about creating a system that enhances stability, flexibility, and comfort. Early on, I made a critical mistake—overloading my rig with gadgets I didn’t need, which made it unwieldy and difficult to operate. That’s a common pitfall many beginners fall into. The truth is, a poorly designed setup can turn your shoot into a nightmare, causing shaky footage, fatigue, and even equipment damage.
This is why I want to help you avoid those costly mistakes. Today, we’ll explore practical strategies to build your perfect camera rig, tailored to your shooting style and needs. Whether you’re shooting documentaries, music videos, or narrative films, a well-thought-out setup can dramatically improve your results. I’ll guide you through selecting the right accessories, balancing your gear, and customizing your rig for maximum stability and efficiency. If you’ve ever faced the frustration of unstable shots or struggled with bulky rigs, stick around—these tips will transform your filmmaking.
Is a Complex Rig Truly Necessary for Professional Results?
Honestly, early in my journey, I believed that more gear meant better footage. That led me to buy every gadget on the market, only to realize later that simplicity often wins. A complex rig can be tempting, but it’s crucial to focus on what truly supports your shooting style. Sometimes, less is more. For example, a lightweight shoulder rig combined with a few essential supports can deliver the stability you need without sacrificing mobility. If you’re unsure about what to prioritize, check out this building guide for more insights.
Remember, the goal isn’t just to have a fancy setup, but one that helps you tell your story effectively. I’ve learned through my own mistakes that planning and understanding your gear’s purpose are the keys to a successful build. Ready to dive into the practical steps? Let’s go!
Start with a solid foundation
My first attempt at assembling a camera rig was a mess — too many parts, uneven weight distribution, and no real plan. I learned quickly that a stable rig begins with choosing the right support system. Begin by selecting a quality support cage that fits your camera size and shooting style. For example, a compact, lightweight cage is perfect for run-and-gun shoots, while a larger one offers more mounting options for complex setups. Check out this essential shoulder rig guide to find what suits you best.
Balance your weight distribution
Once you have your support cage, focus on balancing your camera setup. I once added a heavy battery pack on one side, which caused constant strain on my wrist. To avoid this, use counterweights and strategically place accessories to keep the rig balanced around your hand or shoulder. Think of your rig as a see-saw — if one side is heavier, it will wobble. Use a quick-release plate to easily adjust your camera’s position and maintain proper balance. This simple step dramatically reduces fatigue and improves stability, especially during long shoots.
Attach essential accessories thoughtfully
Not all accessories are created equal. I once overloaded my rig with every available gadget, forgetting that each added weight compromised stability. Focus on essential items like a reliable follow focus, matte box, and minimal cables. Use supportive accessories that enhance your shot without making your rig bulky. Mount accessories close to your camera center to prevent unnecessary leverage and wobble.
Use a shoulder rig for mobility
When I transitioned to a shoulder rig, my handheld shots became smoother and more controlled. For instance, during a documentary shoot, I adapted my setup with a lightweight shoulder support, which allowed me to move freely without sacrificing stability. Invest in a top-quality shoulder rig that distributes weight evenly and provides adjustable handles. This not only elevates shot quality but also reduces fatigue during extended filming sessions. Explore this shoulder rig guide for detailed insights.
Adjust and test repeatedly
Building your perfect rig isn’t a one-and-done task. I learned this the hard way during a shoot when my camera suddenly wobbled. After making small adjustments—tightening screws, repositioning accessories, and balancing weights—I finally achieved a steadier shot. Always test your setup with the actual camera and lens you plan to use. Walk around, shoot some test footage, and tweak as needed. Remember, a stable rig is a result of continuous fine-tuning, not just initial assembly.
Prioritize comfort and ergonomics
Lastly, never overlook comfort. I once ignored ergonomic considerations, leading to neck pain and shaky footage. Use padded handles, adjustable supports, and ergonomic grips to make your rig comfortable for hours of filming. When your gear feels natural to hold, your shots will be more stable and your mind more focused on storytelling, not discomfort. For advanced tips on customization, see this support system guide.
Many filmmakers assume that investing in the latest, most complex rig automatically guarantees professional results. However, this misconception can lead to costly mistakes and overlooked nuances that significantly impact your footage quality. Let’s dig deeper into what most people get wrong about camera rigs and how understanding these subtleties can elevate your filmmaking game.
Why Bigger Isn’t Always Better When It Comes to Rigs
It’s a widespread belief that a more elaborate setup with multiple accessories and supports equals better stability and professionalism. In reality, overcomplicating your rig often introduces unnecessary weight and complexity, which can cause fatigue, wobbling, and even damage your gear. Experienced filmmakers know that a streamlined, purpose-built rig—focused on your specific shooting style—delivers superior results. For example, a lightweight shoulder rig can outperform a bulky, multi-piece system when used correctly. Check out this guide to essential shoulder rigs to find a balanced setup that suits your needs.
The Oops Factor: Overloading Your Rig with Gadgets
Adding every accessory you see on professional rigs might seem impressive, but it can backfire. Extra weight and uneven distribution compromise stability, especially during handheld shots. I’ve seen many filmmakers struggle with rigs that are cluttered and unwieldy because they ignored the importance of proper weight balancing. Remember, each added component should serve a clear purpose. Focus on high-quality essentials like a reliable follow focus and matte box, and mount accessories close to the camera’s center of gravity. For tips on choosing the right accessories, explore this supportive accessory guide.
Does a Fancy Rig Really Make You a Better Filmmaker?
Contrary to popular belief, the quality of your footage relies more on technique and understanding your gear than on having the most expensive setup. Many professional filmmakers achieve stunning results with minimalist rigs by mastering their tools and focusing on shot composition. An overly complex rig can sometimes hinder flexibility and slow down your workflow. Instead, invest in a versatile, well-balanced setup and learn how to adapt it to various scenarios. To see how to optimize your rig for different environments, check out expert tips on rig optimization.
Have you ever fallen into this trap? Let me know in the comments. Remember, understanding the nuances and common misconceptions about camera rigs allows you to make smarter choices, ultimately leading to better footage and a more enjoyable filmmaking experience.
How do I keep my filming tools in top shape over time?
Maintaining your filmmaking equipment is crucial for ensuring consistent, professional results. I personally swear by regular inspections and proper cleaning routines. For instance, after every shoot, I carefully wipe down my camera components with microfiber cloths and compressed air to remove dust and debris. This prevents buildup that can impair functionality. Additionally, I check all screws and mounting points for tightness to avoid unexpected gear failure during critical shots. For more detailed maintenance routines, I recommend consulting the privacy policy of your gear provider, which often contains manufacturer-specific care instructions.
Investing in high-quality tools pays off in the long run. I rely on a few key accessories, like the supportive accessories that are built to last and facilitate quick setup and breakdown. These include durable quick-release plates, modular handles, and shock-absorbing mounts. These tools help me maintain stability and reduce wear and tear, saving time and money over the years.
What tools do I recommend for consistent performance?
One of my go-to tools is a high-quality tripod with fluid head, which I personally use to achieve smooth pans and tilts. I prefer models with sealed bearings and robust build quality, because they withstand frequent transport and tough conditions. For handheld shots, I rely on ergonomic rigs and top handles, like those discussed in top handle rig accessories. These significantly improve comfort, allowing me to shoot longer without fatigue.
Software tools are equally important. I use dedicated editing suites such as Adobe Premiere Pro or DaVinci Resolve, which I keep updated and backed up regularly. A good rule of thumb is to schedule quarterly updates and perform test renders to catch issues early. This proactive approach prevents bugs from disrupting your workflow during critical editing phases.
Preparing for future growth and scaling your setup
As your projects evolve, so should your tools. I predict a trend toward more modular, cloud-connected gear that allows remote diagnostics and maintenance. For now, focus on scalable accessories like adjustable rigs and versatile mounts. For example, integrating a flexible support system that can adapt from handheld to tripod setups will save you resources in the long run. Check out this guide for expert tips on optimizing your setup for growth.
Don’t forget, consistent maintenance and choosing the right tools are investments in your craft. Try scheduling a monthly check-in for your gear, and consider upgrading key components as your needs grow. Remember, a well-maintained rig not only improves shot stability but also extends the lifespan of your equipment.
The Hardest Lesson I Learned About Building Camera Rigs
One of the biggest surprises in my filmmaking journey was realizing that a complex, gadget-laden rig often hampered my creativity rather than enhancing it. I used to think more accessories meant better shots, but I learned that simplicity and purpose lead to true stability. That lightbulb moment taught me to strip down my setup and focus on what truly supports my storytelling.
How I Discovered the Power of Proper Balance
Initially, I ignored weight distribution, which resulted in shaky footage and quick fatigue. Once I started experimenting with counterweights and repositioning accessories closer to the center of gravity, my handheld shots became noticeably steadier. Achieving perfect balance isn’t just a technical step — it’s a game-changer for fluid, professional-looking footage.
Why Ergonomics Can Make or Break Your Filmmaking
After neglecting comfort, I found myself in pain after long shoots and my footage suffered from shaky hands. Incorporating padded handles and adjustable supports transformed my experience. When your gear feels natural to hold, your shots improve, and your enthusiasm for filming stays high. Ergonomics isn’t a luxury—it’s a necessity for consistent, high-quality results.
My Secret Weapon for Fast, Reliable Setup
The biggest breakthrough came when I adopted quick-release plates and modular accessories. This small investment saved me hours of setup time and made it easy to switch between configurations. If you want to maximize efficiency on set, I highly recommend exploring essential shoulder rigs. They’re a cornerstone for smooth, professional shoots.
What I Wish I Knew Before Building My First Rig
Looking back, I wish someone had told me to start with a clear shooting style and only add accessories that serve that purpose. Overloading with gadgets can turn your rig into a burden instead of a support. Focus on quality, balance, and ergonomics first—everything else can come later. Remember, a well-built rig is a tool for storytelling, not just a collection of shiny parts.


Reading through this comprehensive guide, I can honestly say that my first attempts at building a camera rig were quite the disaster. I overthought everything and ended up with a bulky setup that caused more fatigue than stability. It’s clear now that starting with a simple, balanced foundation makes all the difference. I particularly struggled with weight distribution early on; I used heavier batteries without considering the leverage effect, which led to shaky shots and quick exhaustion. Since then, I’ve experimented with counterweights and quick adjustments, and the results are noticeable. What’s interesting is how focusing on ergonomics and proper balance not only improves shot steadiness but also boosts confidence during long takes. For those just starting, would you recommend choosing a modular system from the get-go to adapt as your skills and project needs evolve? I’d love to hear how others have tailored their rigs for different shooting styles or environments.
This post really hits home for me, especially about the importance of starting with a solid foundation. I remember initially overloading my rig with all the latest gadgets, thinking it would automatically produce professional-looking footage. Instead, I found it cumbersome and tiring to operate, ultimately affecting my shot quality. It wasn’t until I simplified my setup—focusing on essential accessories and proper balance—that I saw a dramatic improvement in stability and comfort. The point about testing and fine-tuning constantly is so crucial; I’ve learned that adjustments often make the biggest difference. I’m curious—how do others decide which accessories are truly necessary versus those that are just added to showcase on set? Do you have any tips for maintaining that balance as your gear evolves? I’d love to hear different approaches, especially from those who frequently shoot in different environments or styles. This kind of ongoing refinement is what really helps hone our craft.
Reading this detailed guide really resonates with my experiences. When I first started experimenting with camera rigs, I fell into the trap of overloading with accessories, thinking that more gear meant better quality. But I quickly learned that a bulky, unbalanced rig can hinder mobility and cause fatigue, which affects footage quality. Balancing the rig properly and focusing on essential accessories like a solid follow focus, matte box, and ergonomic handles made a big difference. I also started regularly testing my setup with the actual gear I’d use for shoots, which helped me fine-tune everything for stability and comfort. Has anyone found that switching to a modular system early on helped them adapt to different shooting scenarios more easily? I’d love to hear how you’ve tailored your rigs for various environments and projects. Continuous adjustment and ergonomic considerations are truly game-changers, and I think these small details can elevate our filmmaking craft significantly.
This article really highlights the importance of simplicity and purposeful design when building a camera rig. I’ve personally struggled with overloading my setup in the past, adding gadgets that seemed essential but ended up making the rig bulky and hard to maneuver. Since focusing on core accessories and balancing the weight distribution, my shots have become noticeably steadier, especially during long takes. One thing I’ve found helpful is using modular components that can be easily swapped out depending on the project. Have others here found that a modular approach makes it easier to adapt rigs for different environments or shooting styles? It’s such a game-changer for maintaining efficiency and reducing fatigue. I’m also curious—what are your go-to essentials that you make sure to include in your rigs regardless of the shoot? Sharing that could help others prioritize their setups effectively.