Build Your Perfect Camera Rig with Essential Accessories Today
Ever been mid-shoot, feeling like your camera is a ticking time bomb waiting to trip over itself? I remember those tense moments on set when my rig felt more like a loose collection of parts than a cohesive system. It’s frustrating—you’re chasing that perfect shot, but your gear keeps whining, wobbling, or slipping out of control. That lightbulb moment hit me hard: a well-built camera rig isn’t just a fancy toy; it’s the backbone of smooth, professional filming. If you’ve ever faced shaky footage or endless setup struggles, you’re not alone. Today, I promise we’ll tackle how to assemble your ideal camera rig with essential accessories, transforming chaos into confidence.
Why a Properly Equipped Camera Rig Changes Your Filmmaking Game
Think about the last time you tried capturing a dynamic shot with an under-equipped setup. Maybe your camera wobbled, your arms tire quickly, or your focus slipped just as the moment unfolded. These hiccups don’t just ruin the shot—they drain your energy and slow down your workflow. Investing in the right accessories can turn your rig into a powerhouse of stability, flexibility, and efficiency. When I first started, I overlooked the importance of quality support systems, and it cost me hours of post-production fixing shaky clips. Trust me, a little knowledge on essential rig components, like a sturdy top handle or a reliable shoulder rig, can save you lots of headaches. For a comprehensive look at the latest innovations in camera cages, check out this insightful overview of the top camera cage innovations that elevate cinematography today.
Is Rigging Equipment Overhyped? My Early Mistake
I’ll admit it: I once bought cheap accessories, thinking they would do. Spoiler alert—they didn’t. My initial mistake was neglecting the importance of compatibility and quality, leading to frequent adjustments and unstable footage. Since then, I’ve learned that crafting a support system tailored to your filming style makes all the difference. Whether you’re a solo creator or work with a team, understanding what accessories truly enhance your setup is crucial. For professional-grade gear, explore some of the best rig accessories for seamless video production this year, and see how they can work for you.
Now, let’s dive into how you can build that reliable, efficient, and customizable camera rig you’ve always wanted.
,
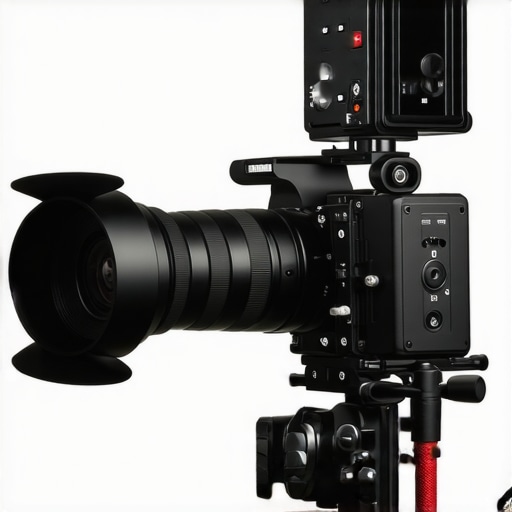
Selecting the Right Top Handle for Stability
Start by choosing a top handle that fits securely onto your camera cage. I once used a cheap, ill-fitting handle during a shoot, which caused wobbling and discomfort. To avoid this, invest in a top handle designed for professional use, like the ones highlighted in this comprehensive review. Attach it by aligning the mounting points and tightening the screws with a torque wrench to ensure a snug fit. This provides a comfortable grip and better control during handheld shots.
Build Your Camera Cage for Protection and Flexibility
Determine Your Needs Before Buying
My first cage was too barebones, limiting accessory mounting options. When building your cage, list essential accessories—microphones, monitors, lights—and ensure the cage supports them without clutter. A well-designed cage like those discussed in this guide will have multiple threads and holes for customization. Measure your camera dimensions carefully and select a cage made of durable, lightweight material such as aluminum. Proper fit ensures protection without adding unnecessary weight.
Secure the Cage Properly
Attach the cage to your camera by aligning screw holes and tightening with the provided tools. Use anti-slip pads if available to prevent scratches. During a recent shoot, I overlooked this step, causing the cage to wobble; tightening screws fixed the issue instantly. Verify tightness before shooting to avoid unexpected shifts.
Creating a Stable Shoulder Rig Setup
For dynamic shots, shoulder rigs distribute weight evenly, reducing fatigue. Select a shoulder rig with adjustable shoulder pads and rods, as recommended in this detailed review. Attach your camera and cage onto the rods, ensuring balance. I once configured mine too front-heavy, leading to an unstable shot. Adjust the position of counterweights and tighten all mounting points to maintain stability and comfort during long takes.
Adding Essential Accessories for Enhanced Performance
Equip your rig with accessories like follow focus, matte box, and external monitor. Mount these onto the cage or rods, ensuring they don’t interfere with each other. Use quick-release mounts for easy adjustments, as demonstrated in this accessories overview. During a shoot, I frequently swapped monitors, and quick mounts saved me valuable setup time. Regularly check all attachments to prevent any loosening during filming.
Fine-Tuning for Comfort and Precision
Test your assembled rig with actual shots. Adjust handle angles, monitor height, and counterweights for ergonomic comfort and shot stability. During my last project, a simple shift in monitor height improved my framing accuracy significantly. Incorporate rubber dampers at stress points to minimize vibrations, especially when walking or moving. Revisit your setup periodically to refine balance and support—this ongoing process converts a basic rig into a custom powerhouse tailored to your filmmaking style.
While many filmmakers focus on selecting the best hardware for their rigs, there’s a pervasive myth that all support equipment is roughly the same or that spending more doesn’t necessarily translate into better footage. Let’s dig deeper into some nuanced pitfalls that even experienced shooters often overlook.
One critical misconception revolves around the notion that a top handle’s primary purpose is mere convenience. In reality, an improperly chosen or mounted handle can compromise your entire shot stability, especially during complex movements. Many believe that any handle will do, but as discussed in this guide on top handle selection, ergonomics and compatibility are paramount for maintaining fluidity and control.
Another trap centers on the idea that a basic camera cage suffices for all filming needs. Many assume that a one-size-fits-all approach saves money, yet inadequate cages or those lacking enough mounting threads can severely limit your customization options. This is where advanced users make the mistake of underestimating the importance of cage durability and versatility. The craft of building a reliable setup involves assessing specific gear requirements, a process outlined thoroughly in this comprehensive tutorial.
When it comes to rig accessories, there’s a tendency to prioritize flashy components—like fancy monitors or quick-release plates—without considering their impact on overall balance and ergonomics. Some filmmakers fail to realize that accessories can shift the weight distribution, causing fatigue and even damaging gear over time. As emphasized in this expert tip collection, thoughtful placement and selection of accessories are critical for maintaining shot quality and comfort during long shoots.
Now, you might wonder, “How do I prevent these common pitfalls from sabotaging my production?” The key lies in understanding that each component—top handle, cage, shoulder rig, and accessories—must work harmoniously within your unique filming context. Don’t just settle for generic gear; explore innovative options and tailor your setup to your workflow. For instance, check out the latest camera cage innovations to stay ahead.
Finally, remember that expertise in support gear isn’t static. Regularly revisiting your setup, refining component choices, and understanding the nuanced differences can dramatically elevate your filmmaking.
Have you ever fallen into this trap? Let me know in the comments. For further insights on building a support system that truly enhances your shots, visit our contact page.
Maintaining your camera rig is crucial for consistent performance and longevity. I rely heavily on quality cleaning supplies like compressed air and microfiber cloths to keep sensitive components dust-free. Regularly inspecting mounting screws and grips ensures no loose parts compromise stability during shoots. For instance, I frequently check the tightness of my top handle and shoulder rig mounts before every session using a torque wrench, which prevents unexpected shifts or wobbling. Using these tools consistently saves time and prevents costly repairs in the future. Looking ahead, advancements in modular accessories will simplify quick adjustments and routine maintenance, making it easier to keep rigs in pristine condition.\n\nHow do I maintain my gear over time? The key is establishing a routine check with specific tools, such as a multi-tool set for fast repairs and specialized lubricants for moving parts. I also recommend keeping a dedicated maintenance kit app on your device to remind you of scheduled inspections and cleanings, which helps you stay ahead of wear and tear. Incorporate a periodic overhaul using comprehensive kits like the ones discussed in this guide.\n\nOne advanced tip is to invest in anti-vibration mounts for your monitor and accessories. These mounts absorb shocks and reduce vibrations that can impact shot stability over long shoots. For example, I installed vibration dampers on my external monitor, which noticeably improved image stability during portable filming scenarios. This simple upgrade extends the lifespan of delicate electronics and enhances shot quality. I urge you to try incorporating vibration absorption into your setup—it’s a game-changer for demanding shoots.\n\nRemember, consistent maintenance doesn’t just preserve your gear; it elevates your entire filmmaking process. Keep your rigs in top condition by routinely using quality tools and adopting proactive habits—your shots will thank you.
What the Toughest Lessons Taught Me About Rig Building
- Overconfidence in cheap gear can lead to costly mistakes. Investing in quality accessories like a sturdy top handle or versatile cage made a world of difference in my workflow and shot stability. Learn more about choosing reliable rig components here.
- Ignoring the ergonomics of your setup can cause fatigue and shaky footage. Fine-tuning handle angles and monitor height isn’t just comfort—it impacts your shot precision. Discover expert tips for ergonomic rigs.
- Many underestimate how proper balance affects long shoots. Adjusting counterweights and practicing shot techniques can extend your stamina and improve footage quality. Find detailed balance strategies here.
- Routine maintenance might seem tedious but preserves your gear’s integrity. Regular cleaning and check-ups prevent unexpected failures. I rely on simple tools and scheduled inspections, which keep my rigs at peak performance. See my maintenance routine.
- Understanding accessory placement prevents unexpected shifts that could ruin a shot. Thoughtful positioning ensures weight distribution and ease of adjustments. For insights, explore this guide to accessory arrangement.
My Top Picks for Building a Do-It-Yourself Cinematic Support System
- Pro Video Support Kit—Trusted for durability and compatibility, it streamlines setup. My favorite for quick adjustments in dynamic shoots.
- Ergonomic Grip Modules—Enhance comfort and control, reducing fatigue during handheld filming.
- Versatile Camera Cages—Customizable with multiple mounting points, supporting diverse accessories. Check out the latest camera cage innovations.
- Anti-vibration Mounts—Protect delicate electronics and maintain image stability over rough terrains. A small upgrade with huge benefits.
Keep Pushing Your Filmmaking Boundaries
Building a rig that’s reliable and tailored to your style is an ongoing journey. Your dedication to fine-tuning and maintenance fuels your progression. The world of filmmaking offers endless opportunities for innovation—so don’t hesitate to experiment with new accessories and setup configurations.
Have you faced a challenge while assembling your camera rig that seemed insurmountable? Share your experience below, and let’s learn from each other’s journeys to better filmmaking.
For personalized advice or to explore the latest rig innovations, reach out through our contact page. Keep creating, and elevate every shot with confidence!
.


This post really hit home for me, especially the emphasis on the importance of quality support gear. I remember starting out with a cheap tripod and shaky clips that took hours to fix in post, which was so frustrating. Investing in a sturdy top handle and a reliable cage made a huge difference in my workflow and shot stability. A good support system isn’t just about avoiding shaky footage; it actually boosts confidence during complex moves. One tip I found useful is to regularly check all the mounts and screws before shooting—nothing kills a shoot faster than a loose component unexpectedly shifting mid-take. For those just building their setup, what are some affordable accessories you recommend that don’t compromise quality? Also, does anyone have experience with modular rigs that can easily adapt for different types of shoots? Would love to hear your insights on balancing cost and durability in a support system.
Reading this post really resonated with me because I initially underestimated the importance of a well-structured rig, thinking any support gear would do. My first shoots were plagued with shaky footage and quick fatigue—mainly because I was using cheap, incompatible accessories. Since upgrading to a solid top handle and a modular cage system, I noticed a dramatic improvement in both shot stability and my confidence on set. The ability to customize my rig for different shoots has been a game-changer, especially when I add accessories like external monitors or follow focus units. Has anyone here experimented with lightweight yet durable materials for their support gear? I find that balancing weight and strength is tricky but worth it for long days of shooting. I’m curious, what are some affordable but reliable brands or setups others have found effective for a DIY filmmaker? Would love to hear your tips on building a versatile, budget-friendly rig.