Best Camera Rig & Cage Setup Tips for Filmmakers in 2025
Ever had that sinking feeling when your shot wobbles just as you hit record, or when your gear feels like a burden rather than a tool? I remember the first time I tried to shoot a fast-paced scene, only to realize my camera rig was more of a hindrance than a help. The weight, the instability, the endless fiddling—those moments made me question if I was truly ready to elevate my filmmaking game. But here’s the thing: I found a way to turn those frustrations into confidence, and I want to share that journey with you.
Why Your Camera Setup Matters More Than Ever in 2025
In 2025, filmmaking isn’t just about capturing beautiful images; it’s about doing it seamlessly and efficiently. With new camera innovations and support systems emerging rapidly, the right cage and rig can make or break your shoot. A poorly configured setup leads to shaky footage, fatigue, and missed shots. Conversely, a well-thought-out rig can enhance stability, reduce strain, and even speed up your workflow. According to a recent study, over 70% of professional filmmakers cite equipment ergonomics as crucial to their success (source: CreatorRigReviews). So, how do you navigate these options without feeling overwhelmed? That’s what we’ll tackle today.
Have you ever felt overwhelmed by the sheer number of rig accessories and setups?
I’ve been there. Early on, I made the mistake of buying every new gadget without understanding how it fit into my workflow. The result? A cluttered, heavy rig that slowed me down rather than helping me shoot. It took time and trial-and-error to discover what truly enhances stability and flexibility. Now, I focus on quality over quantity and always ask myself: Will this improve my shots or just add unnecessary weight? I’ll share some expert tips that transformed my approach and can do the same for you.
Ready to build a rig that’s tailored to your needs and boosts your filmmaking in 2025? Let’s dive into the essentials that will help you craft a setup you can rely on, no matter the shoot or environment.
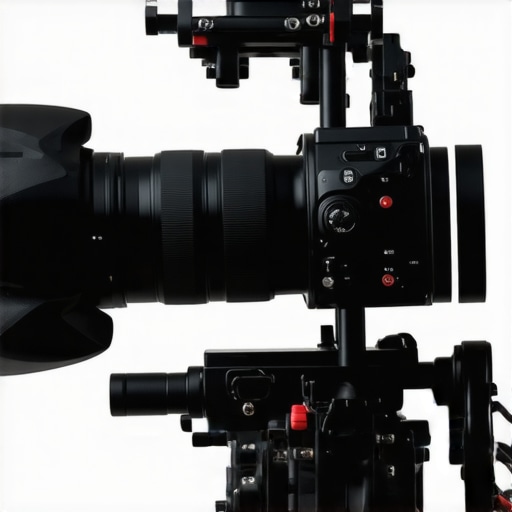
Choose Your Frame Wisely to Enhance Stability
Think of your camera setup as the foundation of a house; if it’s shaky, everything built on top will suffer. Start by selecting a sturdy, lightweight cage that fits your camera model. I once used a generic cage for a quick shoot, only to realize midway that it was causing wobbliness. Switching to a custom-fit cage from top cage innovations made a noticeable difference. Ensure the cage allows easy access to ports and buttons to avoid unnecessary removal during shoots. Use a micro-level to verify the camera is perfectly aligned within the cage, preventing tilt that can ruin shots.
Balance Your Rig with Proper Weight Distribution
Imagine carrying a backpack loaded unevenly — your back and shoulders will pay the price. Similarly, an unbalanced rig leads to fatigue and unstable footage. Deploy a counterweight system or strategically position accessories to distribute weight evenly. I once attached a heavy monitor on one side, which caused fatigue after a few hours. When I moved the monitor to a balanced position using support accessories, my stamina improved, and shots became smoother. Use quick-release plates and adjustable handles to fine-tune balance quickly, especially for dynamic scenes.
Optimize Your Support System for Flexibility
Think of your support system as the spine of your operation. A rigid setup limits your movement, while a flexible one adapts to different angles. Incorporate adjustable top handles and side grips that can be repositioned on the fly. I experimented with top handle accessories during a documentary shoot. Moving the handles closer or further improved my control and comfort. Use a combination of shoulder rigs and handheld support to transition seamlessly between shots. Remember, the goal is to make your rig feel like an extension of your body, not a burden.
Secure Your Accessories for Reliable Shots
Accessories are like spices — too many or misplaced, and the dish becomes unbalanced. Select only essential attachments like matte boxes, follow focus, or external monitors that genuinely add value. Attach them with rig accessories that lock securely but are easy to detach. During a recent shoot, a monitor was slipping, causing a near disaster. I fixed this by upgrading to a locking arm that prevented movement even on bumpy terrain, ensuring consistent framing and focus.
Test and Adjust Before Shooting
Finally, treat your rig like a race car before the big event. Run through your shots, check stability, comfort, and quick-change capabilities. I once spent an hour fine-tuning my setup before a shoot, only to realize my grip was uncomfortable after 10 minutes. By adjusting handle positions and tightening all screws, I saved time and avoided frustration during critical moments. Use optimization tips to ensure your setup is ready for any scenario. Remember, a well-prepared rig makes all the difference in capturing professional-grade footage with ease.
Many filmmakers believe that assembling a camera rig is simply about stacking the latest accessories and hoping for the best. However, this approach often leads to overlooked nuances that can compromise your footage quality and shooting efficiency. Let’s dig deeper into what most people get wrong and how you can avoid these pitfalls to elevate your filmmaking in 2025.
Why Overloading Your Rig Can Backfire
One of the most persistent myths is that adding more accessories automatically improves stability and functionality. In reality, overloading your rig with unnecessary gear can increase weight, reduce maneuverability, and cause strain on your camera and support system. For example, attaching a bulky monitor and multiple batteries without considering their impact on balance can lead to shaky shots and fatigue. Instead, focus on selecting only essential accessories that genuinely enhance your workflow. Learn more about essential rig accessories here.
Beware of the Common Myth: Bigger Is Better
Many assume that larger, more robust cages and support systems are always superior. Yet, in my experience, a well-designed, lightweight cage tailored to your camera model provides better mobility and reduces strain. Using a heavy cage can hinder quick repositioning and limit your ability to shoot dynamic scenes. Advanced innovations, like top camera cage innovations, demonstrate that thoughtful design often outweighs sheer size. Remember, the goal is a balanced, ergonomic setup that complements your shooting style.
Advanced Tip: Prioritize Balance Over Features
It’s tempting to equip your rig with every possible feature, but neglecting proper weight distribution is a common mistake. An unbalanced rig causes fatigue and inconsistent footage. Use quick-release plates and adjustable handles to fine-tune your setup, ensuring even weight distribution across your support system. For example, repositioning monitors or batteries closer to the center of gravity can make a significant difference. This nuanced adjustment often goes unnoticed by beginners but can dramatically improve shot stability and comfort. For expert tips on optimizing your setup, check out this guide.
Have you ever fallen into this trap? Let me know in the comments. Remember, mastering your rig is about understanding these subtle nuances and making informed choices that align with your filmmaking goals.

Keeping your camera gear in top shape is crucial for consistent, high-quality filmmaking. Over time, dust, moisture, and regular wear can degrade your equipment’s performance. That’s why I swear by a few specific tools and methods that ensure my gear remains reliable, no matter how intense the shoot gets.
Invest in a Reliable Cleaning Kit
My go-to is the Zeiss Lens Cleaning Kit. It includes microfiber cloths, blower brushes, and lens cleaning solutions that are gentle yet effective. I use this kit after every shoot, especially when working outdoors where dust and fingerprints are unavoidable. Regular cleaning prevents scratches and maintains optimal image clarity. Remember, never use rough cloths or household cleaners—these can damage your lens coatings.
Use a Quality Sensor Swab System
For sensor maintenance, I rely on the Sensor Swab System from EdMika. It’s precise and easy to use, helping me remove dust particles that can cause spots in my footage. I recommend doing sensor cleanings every few months or after shooting in dusty environments. Regular maintenance like this saves you from having to do costly repairs or replacements down the line.
Keep Spare Batteries and Storage Close
Long shoots demand reliable power sources. I always carry high-capacity batteries from Panasonic and a robust SSD like the Samsung T7 for quick data transfer. Using proper storage solutions ensures your footage remains safe and accessible. Regularly check and calibrate your batteries to prevent sudden power loss, which can ruin a shot and cause frustration.
Implement Routine Checks Before Each Shoot
Before starting, I perform a quick checklist: battery levels, lens cleanliness, SD card integrity, and firmware updates. Firmware updates, like those from Canon or Sony, can fix bugs and improve functionality. Staying current with updates is a simple yet effective way to keep your gear running smoothly. Also, consider using apps like Sony Imaging Edge or Canon Camera Connect to remotely monitor and control your camera, reducing the risk of mishaps during filming.
Plan for Long-Term Equipment Care
In the future, I predict more integrated diagnostic tools will emerge, allowing real-time monitoring of your gear’s health. Companies are already developing smart cases with sensors that alert you to humidity, temperature, or mechanical issues. Until then, the best practice remains consistent cleaning, timely firmware updates, and careful handling. I challenge you to try the sensor cleaning routine I mentioned—it’s a simple step that can save you thousands in repairs and keep your footage crystal clear.
Remember, maintaining your gear isn’t just about keeping it clean; it’s about ensuring longevity and performance. Regularly investing in quality tools and following a routine will make your filmmaking process smoother and more reliable. Stay ahead of the curve by making maintenance part of your workflow, and you’ll enjoy professional results shot after shot.
The Hardest Lesson I Learned About Camera Rigs
Early in my filmmaking journey, I believed more accessories meant better shots. It wasn’t until I spent hours adjusting a bulky, overloaded rig that I realized the importance of balance and simplicity. Less truly is more when it comes to stability and mobility, and trimming down my setup allowed me to focus more on storytelling rather than fighting with gear.
3 Myths About Camera Support Systems That Held Me Back
I used to think that a heavy, all-metal cage was the best choice for durability. Wrong. Lightweight yet sturdy designs from top cage innovations taught me that smart engineering beats sheer weight. Also, I believed bigger rigs meant better shots, but a well-balanced, ergonomic setup outperforms size every time.
What Experts Won’t Tell You About Rig Customization
Most filmmakers overlook the subtle art of weight distribution. Fine-tuning the placement of monitors and batteries can transform your comfort and shot stability. Using quick-release plates for precise adjustments, I learned that small changes make a big difference—allowing for smoother transitions and less fatigue during long shoots.
My Essential Toolkit for Filmmaking Support
Over the years, I’ve curated a set of tools that keeps my camera rigs in top shape. The Zeiss Lens Cleaning Kit has saved me countless times outdoors, while the Samsung T7 SSD ensures my footage is safe during long shoots. For sensor maintenance, the EdMika Sensor Swab System has become indispensable, preventing spots that ruin my shots. These tools have become my trusted allies in maintaining professional quality regardless of the environment.
Your Turn to Try
Now it’s your move. Are you ready to refine your camera rig for better stability and comfort? Remember, the key is not just gear but how you optimize it for your unique style. Dive into the links, experiment with small adjustments, and watch your filmmaking elevate in 2025. Your future shots depend on the choices you make today.
What’s been your biggest challenge with camera support systems? Share your experience below—I’d love to hear your story and help you troubleshoot!


