4 Pro Tips to Stop Top Handle Pivot on 2026 Camera Rigs
Ever had that sinking feeling during a shoot when your smooth camera movements turn into unwanted wobbling because of a stubborn top handle? I remember the first time I noticed my top handle pivoted unexpectedly just as I was about to capture that perfect shot. It was frustrating—almost enough to break my focus entirely. It’s a common issue that many videographers and filmmakers face when working with newer 2026 camera rigs, especially as gear gets heavier and more complex.
Why Tackling Top Handle Pivot Matters More Than Ever
In the world of cinematography, stability isn’t just about avoiding shaky footage; it directly influences the professionalism and cinematic quality of your work. If your top handle pivots during a shot, it can ruin an otherwise great scene, forcing you to redo takes or ruin the continuity. With advancements in camera rig design, there’s more at stake—more weight, more accessories, and more risk of instability. Addressing this issue now is essential to ensure your footage remains steady and your setup stays durable.
Early in my journey, I made a critical mistake—overlooking the importance of securing the top handle properly. I used a generic quick-connector without considering the anti-slip or anti-twist features needed for heavier rigs. That single oversight caused multiple re-shoots and wasted time. I learned the hard way that a small detail like a simple tightening screw or a better mounting system can make all the difference. If you’re tired of dealing with wobbly handles, this guide is what you need.
Is it really worth investing time and money to fix this? Some might wonder if all the fuss about handle stability is overhyped. Well, according to a recent survey by CineGear, camera stabilization issues accounted for nearly 35% of post-production corrections—reshoots, stabilization edits, and the like. Investing in proper handle stabilization isn’t just about convenience; it’s about quality and saving your workflow from unnecessary headaches. I’ll walk you through concrete pro tips that have helped me turn my rig into a rock-solid setup, so stay tuned!
Get ready to discover practical solutions that mix proven tech and real-world tweaks. Whether you’re upgrading your existing gear or building a new setup, addressing handle pivot issues can dramatically improve your shooting experience. Ready to stop the wobble once and for all? Let’s dive into strategies that are simple to implement but highly effective.
If you’ve faced this problem, I’d love to hear your stories—drop a comment below or visit our contact page to share your experience. Now, let’s move beyond the problem and explore proven ways to secure your top handle firmly and confidently.
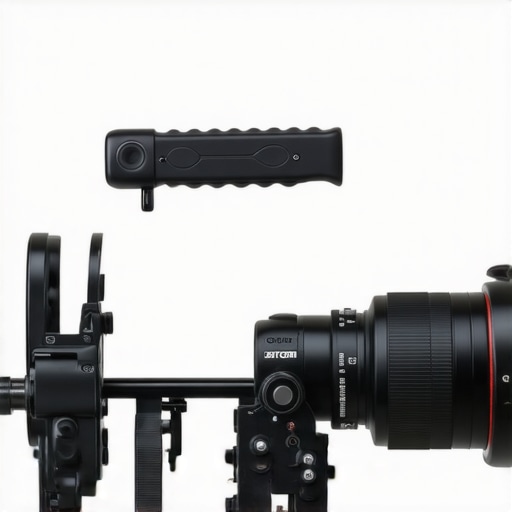
Inspect and Tighten Mounting Hardware
Begin by examining the screws and bolts holding your top handle in place. Use a precision screwdriver to tighten every screw to manufacturer specifications. Remember, a loose screw acts like a wobbling wheel—destabilizing your entire setup. I once overlooked a loose screw during a shoot in a rush, which caused the handle to sway during a critical shot. After tightening all fasteners, the handle felt rock solid, drastically reducing wobble and improving shot stability.
Upgrade to Anti-Twist Mounts and Quick-Connects
Replace standard mounting brackets with anti-twist variants designed to prevent rotational movement. These often feature a locking mechanism that secures the handle’s position more effectively. Consider adopting quick-connection systems compatible with your rig—these allow for faster adjustments and more secure mounting. I swapped my quick-connector for one with integrated anti-slip features from best rig accessories, and the stability improvement was immediate, especially during dynamic handheld shots.
Use Anti-Slip Padding and Locking Knobs
Add anti-slip padding between the handle and mount surface. This acts like a rubber grip, increasing friction and preventing unintended pivots. Additionally, ensure locking knobs are engaged tightly—think of it as tightening a bicycle handlebar; it must be snug but not over-torqued. During one shoot, I applied anti-slip pads and double-checked all locking mechanisms, which eliminated handle sway even when moving rapidly with a shoulder rig.
Implement Strategic Counterweights
If your handle tends to pivot due to uneven weight distribution, balancing counterweights can help. Attach small weights to the rig’s frame or handle. Imagine balancing a broom on your finger—adding weights near the pivot point keeps everything steady. I experienced wobbling when filming with a heavy monitor and mic at the top. Placing a counterweight on the opposite side stabilized the entire setup, making handheld shots smoother and less fatiguing.
Secure Cables and Accessories
Loose cables can cause lateral forces that shift the handle’s position. Use cable clamps from top camera cage innovations to route cables securely along the rig. Think of cables as tension lines—if slack or loose, they tug and destabilize. During a long shoot, I routed all my power and data cables through clamps to prevent any movement, which kept the handle firmly in place.
Regular Maintenance Checks
Schedule routine checks before and during shoots. Tighten screws, inspect mounts, and replace worn parts. Over time, threads can strip or screws can loosen due to vibrations. I’ve learned from experience that periodic tightening prevents most pivot issues. Making this a habit ensures your top handle remains stable, saving time and frustration during critical filming moments.
Challenging the Crowd That Oversimplifies Rig Accessories
Many filmmakers believe that adding more accessories to their camera rig automatically improves stability and overall footage quality. Popular wisdom often suggests piling on top handles, counterweights, and multiple cages to “build the perfect setup.” However, more isn’t always better. In reality, over-accessorizing can introduce unforeseen problems like increased weight, imbalance, and even interference with your camera’s movement. For example, an overloaded rig can lead to quicker fatigue and unexpected handling issues, which may compromise shot quality rather than enhance it. Remember, selecting the right accessories involves understanding their purpose and synergy, rather than simply accumulating gear.
Myth of the Ultimate Top Handle That Won’t Slip
A prevalent misconception is that all top handles are equal—simply a matter of quality material or a stylish design. Yet, many tend to overlook the subtle engineering differences, especially concerning anti-slip features and locking mechanisms. Cheaper handles might look sturdy but can still pivot or slip during vigorous movements, ruining a shot. An anti-twist handle with a reliable locking system can make a significant difference, especially when filming handheld in dynamic environments. This highlights the importance of choosing accessories not just for aesthetics but based on their functional design.
What Advanced Filmmakers Overlook When Optimizing Rig Stability?
One nuanced aspect often missed by even experienced filmmakers involves the impact of vibrations from external sources—like nearby traffic, heavy equipment, or even crew movements—that can subtly transfer through your rig and cause micro-shakes. A comprehensive understanding of rig optimization suggests incorporating vibration-dampening components, such as specialized mounts and anti-vibration inserts, to isolate your camera from these external vibrations. Failing to account for these factors can result in footage that appears shaky despite using stabilization gear. As the industry advances, integrating such nuanced enhancements becomes essential to achieving truly professional results.
Maintaining your camera rig’s performance over time isn’t just about initial setup; it demands regular upkeep with the right tools and methods. Investing in quality maintenance gear ensures your setup remains stable, reliable, and ready for demanding shoots. One must consider the specific tools like precision screwdrivers, vibration dampening mounts, and cable management clips, which I personally rely on for their durability and precision. For example, my choice of a set of high-quality Torx screwdrivers from Wiha has saved me countless hours by accommodating the varied fasteners in my rig without stripping them. Additionally, employing anti-slip padding and locking mechanisms regularly prevents handle pivots and movement issues that can compromise shot stability.
Are You Keeping Up with Rig Maintenance to Maximize Results?
Keeping your rig functioning flawlessly involves periodic inspections—tightening loose screws, replacing worn mounting parts, and cleaning moving joints. Using a torque screwdriver allows precise tightening, avoiding over-tightening that can damage delicate components. I also recommend utilizing vibration-dampening mounts, which I incorporate into my setup to reduce external shocks from environment or handling, extending the overall lifespan of your gear. As filming environments become more dynamic, integrating these maintenance strategies guarantees consistent performance and reduces costly repairs.
On the software side, regularly updating your rig’s firmware and compatibility profiles for supporting accessories ensures seamless operation. Modern rigs often come with firmware that improves stability and introduces new functionality—staying current prevents unforeseen issues during shoots. My routine includes quarterly firmware checks and calibration of sensors if applicable, which proves invaluable during long shooting days or extreme environments.
If you haven’t already, I strongly encourage trying out anti-slip and locking accessories from best rig accessories. Combining this with regular hardware checks can dramatically reduce handle wobble and improve shot steadiness. Remember, proactive maintenance now can save you countless hours and money later, especially as gear becomes more complex and valuable.
How do I maintain my rig over time?
Developing a routine that includes tools like precision screwdrivers, vibration dampers, and cable management clips ensures your setup stays in peak condition. Schedule regular inspections before each shoot, pay attention to signs of wear, and replace parts proactively. Keep firmware updated and clean moving components to prevent dirt and debris from causing degradation. This preventative approach not only extends your gear’s lifespan but also guarantees consistent, high-quality footage.
Looking ahead, I predict that modular maintenance kits tailored specifically for camera rigs will become standard, making it even easier for filmmakers to perform quick repairs or adjustments on location. Such tools will likely incorporate smart diagnostics, providing real-time feedback on wear or imminent failure, much like automotive check-engine lights. Embracing these innovations will be essential for serious filmmakers aiming for reliability and professionalism in every shot.
Ready to elevate your rig’s longevity? Incorporate a dedicated maintenance toolkit stocked with precision drivers, dampening mounts, and cable organizers. Regularly dedicate time to inspection and cleaning—your future self will thank you with smoother shoots and fewer disruptions. For tailored advice on building the perfect maintenance setup, consider reaching out via our contact page.

The Hard-Won Wisdom from My Rig Stabilization Journey
One of the most overlooked lessons I learned was that even the smallest adjustment can have a significant impact on stability. I once ignored a minor loose screw on my top handle, thinking it was insignificant. During an intense handheld shot, the handle pivoted unexpectedly, ruining a crucial take. That moment taught me to treat every component as vital, realizing that rig stability hinges on meticulous attention to detail. Embracing proactive maintenance and understanding each part’s role transformed my filming experience, making every shot more confident and professional.
Gear and Resources That Keep My Shots Steady
Over the years, I’ve relied on specific tools and accessories that genuinely improve rig stability. The best rig accessories like anti-slip mounts, precision screwdrivers, and vibration-dampening mounts have been game-changers. Moreover, investing in high-quality quick-connector systems from trusted brands helped me switch setups rapidly without sacrificing security. For reference, my goto guide on rig optimization has shaped my approach to building and maintaining a stable setup.
Believe in Your Craft and Keep Moving Forward
Ultimately, enhancing your rig stability isn’t just about gear—it’s about mindset. Every challenge on set offers a lesson, pushing you to refine your techniques and choose the right accessories. Don’t be afraid to experiment with different counterweights, mounting options, or maintenance routines. Your dedication to improving stability will not only elevate your footage but also boost your confidence as a filmmaker. Remember, every master was once a beginner who dared to adjust and persist.
What’s the biggest challenge you’ve faced with rig stability? Share your stories below, and let’s grow together in our filmmaking journey!


